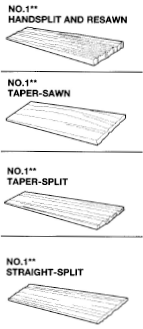
 The minimum recommended pitch for handsplit shakes is 1:3. The maximum exposure for 600 mm (24 in) shakes is 250 mm (10 in) and 189 mm (7 1/2 in) for 450 mm (18 in) shakes. A superior 3-ply roof can be obtained at slight additional cost if the exposures are reduced to 189 mm (7 1/2 in) for 600 mm (24 in) shakes and 140 mm (5 1/2 in) exposure for 450 mm (18 in) shakes.
Interply
Interply is a trade name for the application of felts between every course of shakes. These felts are applied over the shakes at a position 2 times the exposure. For example, when you are using 250 mm (10 in) exposed shakes, install felt 508 mm (20 in) above the butt line. This position should be accurately measured because it can be used for a horizontal guideline in the application of preceding rows. Felts used are generally 13.6 kg or 6.8 kg (30 lb or 15 lb) plain asphalt saturated felt, 450 mm (18 in) wide. Interlayment should be ASTM D226, Type II, non-perforated asphalt-saturated felt or ASTM D4869, Type IV asphalt-saturated felt. Overlap end laps a minimum 100 mm (4 in). These felts should be folded over all hips, valleys and ridges. Interply of felts is not required between wood shingles.
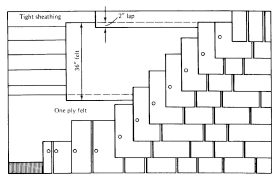
Proper shake application is easy though many roofers have trouble making a neat and weathertight roof. The application methods are basically the same as with wood shingles. However, with shakes at standard double coverage exposures you must apply a 450 mm (18 in) strip of #30 felt, overlapping the tops of each course of shakes 100 mm (4 in). This applies both to roofs with solid sheathing and spaced sheathing. Solid sheathing should be used in areas that have blowing snow.
If a wood shake roof is built on slopes of less than 1:3, you cannot rely on gravity to carry the water off of the roof. In this case you must build a double roof. The lower roof must be constructed of a hot mopped felt and steep asphalt or mineral surfaced roll roofing, over which preservative treated wood spacers are applied in the top coat of asphalt. The shakes, or shingles are then applied with the required exposure.
In any case, a 1 m (39 in) strip of #30 felt must be used at the eave. Keep the 1 m (39 in) strip flush with the very bottom edge for complete protection and use only enough nails to keep it in place. Use large headed roofing nails for nailing the felt. The first strip of 450 mm (18 in) felt must be positioned so the bottom edge is 508 mm (20 in) above the butt edge of the first row of shakes.
Apply felt to as much area as you plan to cover that day and only nail the felt at the top. If wind is a problem, you can nail down band sticks or narrow shakes to hold the felt in place.
When applying the first row of shakes on top of the starter shakes, select only shakes that will permit you to offset the joints of the starter at least 38 mm (1 1/2 in). Maintain this margin on the entire roof. Place your nails about 50 mm (2 in) above the projected butt line of the following row of shingles and 25 mm (1 in) in from each edge. Always use only two nails per shingle regardless of the width. Work above the shingles from off the felt to apply just enough shingles so that you can then sit down to work comfortably. As you shingle, try to determine exactly how many courses you can reach with ease. Applying too many courses at once will slow you down. Taking only 1 or 2 rows at a time will also be slow. Before sitting down to shingle, make sure that you have plenty of shingles and felt laid out in front of you.
Hips and Ridges
Always use longer galvanized nails for nailing the ridge. Usually 8d nails are enough.
To apply the ridge material to the hips, start out at the bottom with a double layer of shake ridge units. The starter or first piece of ridge should be cut back so that it does not lap over onto the second row of shingles. This will allow you to lay a smoother, straighter ridge. Place two nails in each shingle so that they will be covered at least 50 mm (2 in) by the next piece of ridge. To keep the ridge fairly straight, use a chalk line on one side of the ridge.
Factory ridge is easier to lay as each unit is stapled together and made from more uniform shingles. If factory ridge is not available, select the best shingles and split pieces 125 mm (5 in) wide with your hatchet. Prior to laying the ridge put down a 150 mm (6 in) strip of #30 felt to prevent a possible leak if the ridge should split or gap open.
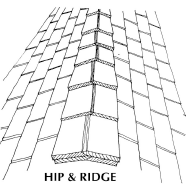
Use a chalk line as you lay the hip ridge, but watch the other side of the ridge shingles for any unit that is wider or narrower than normal. Narrow hip ridge shingles can be set aside and used at the top ridge where they won’t be noticed. The hip ridge will be very evident from the ground. Wide ridge shingles can be narrowed by splitting off the excess with your hatchet.
Shake roofs are desired because of their overall rustic appearance. However, neatness and straight courses are necessary to avoid a cobbled-up look, particularly on steep roofs. Before you start a roof, look around the building and do some planning. Think of the shakes as though they were siding. The courses must wrap around the building as if it were a hip roof. Keep the courses even, regardless what type of ridge is used. When in doubt, use an extra layer of 13.6 kg (30 lb) felt under each joint or apply galvanized metal flashing under the corners.
Wall Flashing
Vertical walls are always flashed with step flashing as in the asphalt shingle application. The length of step flashing used must be at least 75 mm (3 in) longer than the exposure of the shakes or shingles. Install one piece per course. Wall flashing along horizontal projections can be installed using the same method as in the asphalt shingle application.
Roof Flashings
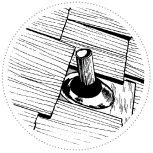
Installing shakes and shingles around vent pipes can be accomplished with roof jacks. Ensure a 2-ply coverage over the top portion of the roof jack. Ensure no nails are placed through the roof jack base.
 Chimneys
Roof projections of this type can be sealed using base flashing, step flashing and saddles similar to the installation of asphalt shingles. Do not use copper as a flashing material with cedar products.
Valleys
Because of the rigid construction of wood shakes and shingles, and their longer life span, an open metal valley should be used. 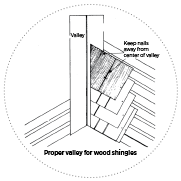 Install a layer of felt along the center of the valley. Over this, center a 600 mm (24 in) sheet of valley flashing. Flashing should overhang eave 38 mm (1 1/2 in) and all laps must be a minimum 150 mm (6 in). Two chalk lines should be drawn on flashing the length of the valley. These lines should be 75 mm (3 in) apart at the ridge and taper larger 3 mm per 0.3 m (1/8 in per foot). Cut the shakes or shingles by ensuring the tops are in line with the course you are applying. Do not place any nails close to the valley centerline.