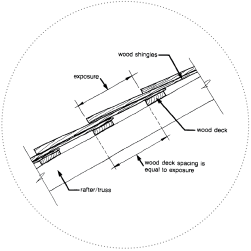
 Where wood shingles are applied over spaced sheathing, proper application starts with properly spaced sheathing. The sheathing should be spaced the same as the shingle exposure so that the roofer does not have to raise his nails too far. Properly spaced sheathing ensures a tighter and better roof. The measurement for spaced sheathing depends on the exposure of the shingles and is easy to figure out. Start with the second sheathing board as this is where the first row of shingles must be nailed. If the roof exposure is to be 125 mm (5 in), measure from the center of the second sheathing board and set the third board on a 125 mm (5 in) center from the second board. Now measure the space between the two boards and make a wooden gauge to space the rest of the sheathing.
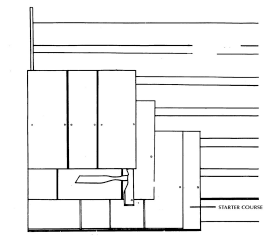
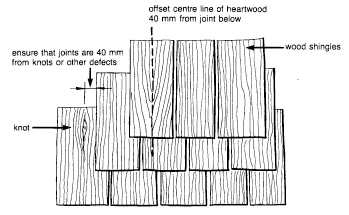
The shingle edges should not be crammed together. Leave a 6.4 mm (1/4 in) space to prevent buckling. Always leave a side-lap of at least 38 mm (1 1/2 in) between side laps in successive courses. Try to prevent laying two joints in line if they are separated by only one course of shingles. This way, if the one shingle between the two joints ever splits there will be no leak. At the eave or drip edge always allow a 32 mm (1 1/4 in) to 38 mm (1 1/2 in) overhang. On gable roofs leave about a 19 mm to 25 mm (3/4 in- 1 in) overhang at the rake edge. Many roofers use the first joint in their index finger to gauge this overhang.
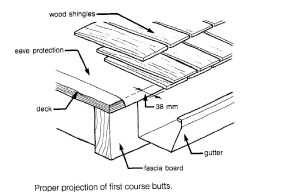
Occasionally you may need a straight line at the drip edge to keep the starter course even. It is good practice to use a straight line if the edge is too crooked to gauge from, or the amount of overhang is too much to gauge easily.
Material Selection
 Good application starts with selecting the proper wood shingles for the job. A good wood shingle roof assembly is never less than three layers thick. Consequently, the exposure of any given shingle must be slightly less than 1/3 the total length. If the roof pitch is 1:3, or more, allow a 125 mm (5 in) exposure for 400 mm (16 in) shingles, a 140 mm (5 1/2 in) exposure for 450 mm (18 in) shingles and a 189 mm (7 1/2 in) exposure for 600 mm (24 in) shingles. If the roof pitch is less than 1:3 but not below 1:4, allow a 95 mm (3 4/5 in) exposure for 400 mm (16 in) shingles, a 100 mm (4 in) exposure for 450 mm (18 in) shingles and a 146 mm (5 4/5 in) exposure for 600 mm (24 in) The figures above are the maximum recommended exposures for Number 1 Blue Label shingles. When applying Number 2 Red Label and Number 3 Black Label shingles, the exposures must be somewhat less, as recommended by the Cedar Shake and Shingle Bureau.
The nails are the next most important part of a wood shingle or shake roof. Use only rust resistant nails, either zinc coated or aluminium. Fasteners are recommended as meeting requirements of ASTM D153, Class D hot-dipped galvanized or Type 304, or Type 316 stainless-steel box nails. Use 3d, 32mm (1 1/4 in) nails for 400 mm (16 in) and 450 mm (18 in) wood shingles and 4d, 38 mm (1 1/2 in) nails for 600 mm (24 in) wood shingles. For re-roofs, use 6d, 50 mm (2 in) nails, and for hips and ridges 8d, 64 mm (2 1/2 in) nails may be needed. Never use bright, blue or steel wire nails as the bare iron is not compatible with the natural preservative in the wood shingles. In less than ten years the shingles will begin to dissolve the nails.
The 6d nail is usually adequate for handsplit shakes but be sure that the nail penetrates at least 12.7 mm (1/2 in) into the sheathing.
Proper positioning of the nails is very important. Two nails are required per shingle regardless of the width. Always nail within 19 mm (3/4 in), 25 mm (1 in) for shakes, of the side edge of the shingle. Nail high enough so that the nails are covered by the next course. On wood shingles with a 125 mm (5 in) exposure, nail about 178 mm (7 in) from the bottom edge of the shingle. On shakes with a 250 mm (10 in) exposure, nail about 300 mm (12 in) from the bottom edge. If you nail too high or too far in from the edge the shingles will tend to curl up.
When nailing the shingles at the rake edge, try to place the nails as close to the rake as possible. You may have to nail through the fascia or trim to keep the shingles flat. Any type of wood that is left sticking out unnailed will eventually curl up. This is why proper nailing is so important. If the shingle splits while you are nailing it and the crack offsets the joint in the shingle below at least 38 mm (1 1/2 in), place a nail on each side of the split. You can treat the split shingle as two shingles. If the crack does not offset the joint in the shingle below, remove the split shingle and apply another.
Ridge
The appearance of every roof depends on the neatness of the ridge. Moreover, a sloppy ridge usually means a bad roof. Factory ridge units make the job much easier because the two pieces are stapled together solidly and offset mitered joints are stacked alternately for easy application. Each piece of ridge or ridge unit must have two nails on each side, placed about 178 mm (7 in) above the butt edge. Give each ridge unit the same exposure as the roof shingles. Offset the ridge joints so that the ridge remains watertight if several joints open up as the roof ages. Lay a narrow strip of #30 felt over the hip before applying the ridge shingles. Use a chalk line to keep the units straight.
Where two ridges meet, trim as neatly as possible and with as few exposed nails as possible. When starting a new run, always start out with a double ridge. At junctions like this you may have to adjust the shingles somewhat to make a tight fit. Make the ridge meet in the middle and build a saddle by reversing two units on top of each other. Then trim back the tail ends and leave about 200 mm (8 in) of the butt portion. Always use longer nails to apply the ridge so that the nails penetrate the sheathing.
Sometimes factory ridge units are not available. If the roof can’t wait, you may have to cut your own ridge shingles. This takes some time. A table saw is needed and the blade should be set at about 35° angle. Set the guide at whatever width ridge you may need. Some roofers prefer about a 100 mm (4 in) ridge. Cut two shingles at one time with one shingle butt first and the other tail first. The top piece of ridge will come out about 6 mm to 8 mm (1/4 in to 1/3 in) wider than the bottom piece. The next piece will be reversed. This will give you alternating mitred joints like the factory-made ridge. Cut as much ridge as you will need, alternating each cut every time. At 125 mm (5 in) exposure you will need 24 units or pairs for every 3 m (10 ft). As you lay the two-piece ridge, lay the narrow piece first and make it flush with the roof so that the other piece will lie flat. Use two nails per piece.