The majority of buildings constructed today have some type of insulation installed within the building envelope. Insulation provides a thermal blanket around the building to keep the interior warm or cool, depending on the season. The type and thickness of the insulation is usually determined by the architect. Insulation may be installed in one or more layers. Installing insulation in two layers has several advantages, including:
- Off-setting of joints thereby reducing thermal bridging.
- Thinner boards are easier to cut and handle.
In all cases the insulation must:
- Be compatible with other products used in the system.
- Possess adequate compressive strength to withstand foot traffic during construction.
- Possess adequate strength and rigidity span the deck flutes.
- Be of equal sized sheets.
- Be of uniform thickness.
- Have good cohesive and adhesive properties (will not shear apart or delaminate).
- Be dimensionally stable.
The primary insulation is the type of insulation applied on a roof deck to achieve the major portion of the thermal resistance (R-value, RSI). As with the other components of a roof system, the insulation must be applied under dry conditions to a clean, smooth, dry surface. The typical steps for installing the primary insulation are as follows:
- Apply the bonding agent to secure the insulation to the deck.
- Install the base (standard) insulation.
- Apply the bonding agent to secure the second layer of insulation and/or tapered insulation to the deck (if required).
- Install the second layer of insulation and/or tapered insulation (if specified).
- Prepare roof drain openings.
Note: If one or more layers of the insulation are to be mechanically fastened, the application of the bonding agent for those layers may be eliminated and replaced by the installation of fasteners from the uppermost unbonded layer, through the underlying layers of insulation and/or deck cover and into the structural roof deck
Adhesives
The range of adhesives available to the roofing industry has expanded dramatically over the past several years and an exhaustive description of all of these products is beyond this scope of this manual.
However, the adhesives used to secure roofing materials and components. including insulation, have common characteristics which can be summarized as follows.
The adhesive must be compatible with both the application substrate and the insulation or other material being secured.
The adhesive material must have been tested to confirm performance and durability characteristics.
The adhesive application rates, patterns, and conditions must be in accordance with the manufacturer’s’ written instructions.
Where hot bitumen is used to adhere the base layer of insulation to the deck or vapour retarder, and to adhere additional insulation layers, tapered insulation and/or cover boards to the base layer:
Apply bitumen with a mop at a rate of 1 to 1.5 kg/m² (20 to 30 lb/square). Apply the bitumen in a full and uniform mopping
Typically, the same bitumen type is used for insulation attachment as is used for the membrane installation.
1. Installation of base (standard) insulation.
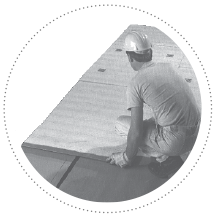
After the bonding agent has been applied, you must install standard insulation or base layer. Generally, the starting point for installing the insulation is an unobstructed area in a corner of the roof deck. When installing the insulation, remember to always:
- Apply all sheets of insulation with joints tightly butted together.
- Ensure a tight fit to the contour of all walls and roof penetrations.
- Lay sheets lengthwise into the bonding agent along the length of the roof.
- When the opposite end of the roof is reached, cut the insulation to fit.
 Install the second row alongside the first, ensuring the end joints between rows are offset (staggered) a minimum of 150 mm (6 in). Usually, the remaining piece (cut off the previous row) is used to start the next row.
- On steel decks, make sure that the edges of the insulation are fully supported on the top bearing flanges of the deck.
- Gaps at insulation joints greater than 6 mm (1/4 in) must be filled.
- Continue to lay out the insulation sheets over the entire roof area, ensuring that all end and side joints are tightly butted together.
- When installing multiple layers of insulation, the end and side joints between layers must be offset a minimum of 150 mm (6 in).
Mechanically Fastened
On some projects, the base insulation must be mechanically fastened to the deck with screws and plates, or special nails designed for the particular deck. When fastening to the deck, it is very important that the correct type and length of fastener be used, and that they are spaced in the pattern required by the roof system manufacturer. Most manufacturers have specifications that show the spacing and number of fasteners required for board insulation installed as part of their roof systems.
The following are some general guidelines for fastening insulations to various decks:
- Use only fasteners (screws, plates, nails) as specified by the roof system manufacturer.
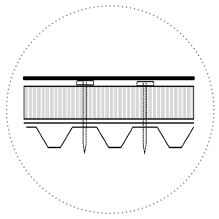 Install the fasteners in the pattern (number and spacing) required by the roof system manufacturer.
- Do not overdrive screw type fasteners. Overdriving will strip the threads, bend or break the plates, or damage the deck and insulation.
- Do not under-drive the fastener. This will leave it loose.
- Use the proper length of fastener. Fasteners that are too short won’t engage the deck. Fasteners that are too long may be driven through the deck making the hole too large.
- Drive the fastener at right angles (perpendicular) to the deck.
- On steel decks, engage the fastener on the top flange only.
Vapour Retarder – Mechanically Fastened Insulation
When the insulation is mechanically fastened to the deck, it may not be necessary to bond the vapour retarder to the deck. However, all side and end laps must be securely sealed with adhesive to ensure the continuity of the vapour retarder.
Split System
The need for a continuous vapour retarder can present a difficulty when mechanical attachment of the insulation is specified. Penetration of the vapour retarder from the fasteners and thermal bridging may lead to moisture within the roof. The best way to avoid this problem is to follow the recommendations of CRCA (Canadian Roofing Contractors’ Association) and FM (Factory Mutual) and construct a “split system”. In a split system, a thin layer of roof insulation (thick enough to span the flutes on a steel deck) or a deck cover panel such as glass matt faced gypsum board, is first fastened to the deck. Over this base layer, the vapour retarder is applied. In many cases, this consists of two layers of asphalt felt mopped into hot bitumen. Finally, the balance of the insulation and membrane cover is adhered. By using the split system:
- The vapour retarder is not compromised by the penetration by fasteners.
- Potential for damage from traffic during construction is reduced.
- Thermal bridging at fasteners is eliminated.
- Shorter fastener lengths are required. This is particularly useful on projects where thick amounts of insulation, flat or tapered, are required.
- A thermal barrier can be used as the first layer allowing many alternative types of insulations and membranes to be used.
- Large areas of the roof can be closed in and made watertight in a shorter period of time than would otherwise be practical.
2. Installation of tapered insulation (if specified).
Once the base insulation has been installed, you must install the tapered insulation, if specified. Tapered insulation is designed by a manufacturer to fit a specific roof area. The manufacturer will provide a blueprint, cut the insulation to the specified slope and label each sheet or bundle.
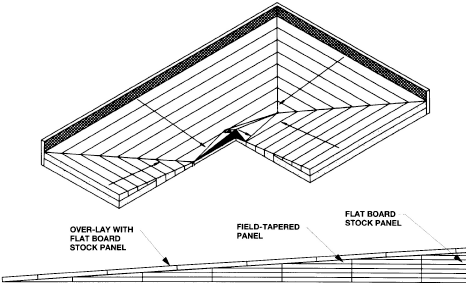
Generally, installing tapered insulation is like building a puzzle which has all the pieces systematically numbered and a map to follow the sequence.
When installing tapered insulation, always ensure all insulation boards are fully bonded to their substrate and that all joints are tightly butted together.
3. Prepare roof drain openings
Once the insulation and/or cover board has been installed, it is time to prepare the roof drain openings. All roof drain openings must be countersunk into the primary insulation to compensate for the thickness of the lead and/or membrane flashings, allowing for positive water drainage. There are 3 steps to preparing the drain as follows:
- Taper the insulation out from the drain opening a minimum distance of 600 mm (2 ft) on all sides. This can be done by cutting or shaving the insulation to the proper thickness in the area or using tapered pieces of insulation made for sumps at drains.
- Slope the insulation towards the drain at a rate of 1:25.
- Ensure the slope comes down in a uniform smooth manner, much like a funnel.