After the primary insulation has been installed, the roofer must prepare the surface to install the roofing membrane as follows:
- Install the secondary insulation or coverboard.
- Insulate the roof curbs.
- Complete the vapour retarder.
- Install the cant strip.
1. Install the Secondary Insulation or Cover boards
Many insulations require a protective cover or cover board because you cannot directly mop on to them. Polystyrene, for example, will melt from the heat of the asphalt. Other insulations may also be crushed or damaged when a roof membrane is applied directly to them, leading to performance problems in the future.
These problems can usually be overcome by installing a cover board. Examples of cover board include wood fibreboard, perlite board, fibre-reinforced gypsum board, glass-faced gypsum board, stone wool and high-density polyisocyanurate board. With most roof insulation materials, the cover board is set in a full mopping of asphalt 1.0 to 1.5 kg/m² (20 to 30 lb/square) or an appropriate adhesive applied to the top surface of the base insulation.
Mop & Flop
However, because of the low melt temperature of polystyrene insulations, the Mop & Flop method is generally used to apply a cover board if hot applied asphalt is used as adhesive. There are 4 important steps in applying cover boards using the mop & flop method.
- Lay out the cover board, bottom side up, roughly along the area in which the cover board is to be installed.
- Fully mop this bottom side with hot bitumen at a rate of 1 kg/m² (20 lb/square).
- Carefully roll the cover board over and install in place. The asphalt must be at the right temperature, hot enough to stick to the primary layer of insulation, but not so hot as to melt it.
- Fill any gaps that may have developed along the edges of the cover board material to obtain a smooth surface.
For coverboards installed over polystyrene insulation, ship lapped edges will prevent hot bitumen from overlying applications from seeping through the joints and melting the foam insulation below. Otherwise, the joints of the cover board should be taped.
In all cases, the joints between the cover board and primary insulation must be offset a minimum of 150 mm (6 in). The cover board must be embedded in full moppings of asphalt or adhesive applied at an appropriate rate and pattern.
2. Insulate the Roof Curbs
Roof curbs should be insulated to prevent heat loss and condensation. Curbs are commonly insulated within the curb construction (insulated stud wall or insulated steel frame). However other insulation strategies may also be used.
3. Complete the Vapour Retarder
 After the roof curbs have been insulated, you must complete the vapour retarder. Where an asphalt compatible vapour retarder is installed so that it extends at least 125 mm (5 in) above the specified insulation thickness along curbs and parapet complete the vapour retarder as follows:
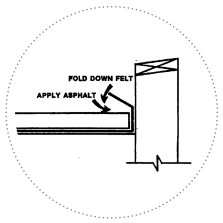
- At curbs, roof edges & walls
Mop hot bitumen around the roof edge and fold down the vapour retarder from the wall and embed it in the bitumen. Ensure that the vapour retarder extends onto the top surface of the secondary insulation a minimum of 150 mm (6 in).On single ply roofs where a polyethylene vapour retarder has been used, extend the polyethylene up the wall, curb, or on to the blocking a minimum of 75 mm (3 in). Seal the edge of the vapour retarder to the wall, curb, or blocking with two-sided butyl tape or a bead of compatible sealant. Press the polyethylene firmly into the tape or sealant to ensure a tight seal. - At drain openings
- Extend the vapour retarder up on all roof drain openings. Cut the insulation to form a round hole opening to fit the size of the drain bowl.
- With a brush, coat the surface of the insulation from the deck to the top of the secondary insulation with a compatible adhesive.
- Set and press the vapour retarder into the adhesive.
Note: This or a similar procedure must also be followed for any other type of opening through the roof deck (e.g. electrical lines).
4. Install Cant Strips
On BUR roofs, cant strips must be installed along all points where the roof deck intersects a wall or curb. Cant strips are used to gradually change the plane angle of the roof membrane. This will allow the membrane to be installed in a tightly fitted manner. Install the cant strip around the outside of the curb.
Fibre cants should be embedded in a mopping of asphalt (at the rate of 1 kg/m² (20 lb/ square) and/or mechanically secured with screw and plate fasteners. Mitre and cut all corners at a 45° angle ensuring a tight fit. Upon completion of the cant strip installation, you will be ready to proceed with membrane installation.
Wood cant strips must be installed on supporting blocking and secured into both the blocking and the face of the curb to prevent warping.