Vapour retarders need only be installed when constructing conventional, insulated roof systems. For these roofs, a vapour retarder must be installed on top of the deck and below the insulation (on the warm side) to protect the insulation from moisture from the building interior.
The quality of vapour retarder required depends upon two factors:
- Building design (deck, roof system, etc.).
- Interior humidity and temperature.
Because there are many qualities of vapour retarders, this section will deal with procedures for installing vapour retarders under normal interior humidity and temperatures (RH: 40%, 21°C [70°F]). In situations where there is high humidity (swimming pools, hockey arenas, paper mills etc.), a higher quality vapour retarder may be required.
There are several types of vapour retarder membranes currently used in the industry;
- A single ply non-bituminous a two-ply hot applied.
- Pressure sensitive (self-adhesive) modified bitumen.
- Cold adhesive adhered modified bitumen.
- Torch applied modified bitumen.
- Composite modified bitumen membrane panels.
Single Ply Non-Bituminous Vapour Retarder
Single ply non-bituminous vapour retarders commonly consist of laminated kraft paper or heavy gauge polyethylene (typically for single ply roof systems only).
The typical steps for installing a kraft laminate single ply vapour retarder on a steel deck below a bituminous membrane system include:
- Embed a layer of kraft laminate vapour retarder in adhesive.
- Starting at the low point and at right angles to the slope, embed a layer of the vapour retarder in adhesive.
- Apply adhesive at a rate of 0.5 l/m² (1.2 gal/square) or as specified by the manufacturer.
- Ensure that the vapour retarder extends up all walls, parapets, and curbs and that it is at least 125 mm (5 in) higher than the thickness of the insulation being used. This is important because the paper will later be folded over the top of the insulation.
- Apply vapour retarder to the whole deck.
- Continue the installation of additional vapour retarder in adhesive and apply adhesive at a rate of 0.5 l/m² (1.2 gal/square) or as specified by the manufacturer. Continue to do this until the whole deck has been covered.
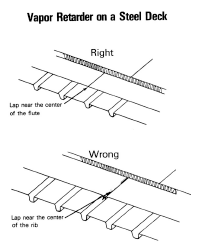
- Maintain at least 100 mm (4 in) side laps supported by the top deck flute and 150 mm (6 in) end laps.
- Ensure that the adhesive is applied in a continuous manner on all lap areas. (Because the vapour retarder is single ply, extra care must be given to the lap areas to ensure a continuous seal.)
- Extend the membrane up vertical surfaces and a minimum of 150 mm (6 in) onto the surface of the insulation cover board to facilitate sealing to the roof membrane.
- Patch vapour retarder if necessary.
- Patch all rips or tears in the vapour retarder before any insulation is applied.
- Once it has been installed, the vapour retarder should be continuous with no fish mouths or wrinkles.
When the roof insulation is to be mechanically fastened to the steel deck with screws and plates, it may not be necessary to embed the vapour retarder into adhesive applied to the entire top surface of the flanges of the steel deck. Specifications may call for only the side laps and end laps to be sealed in adhesive. If this is the case, ensure that all laps are completely sealed prior to the application of the insulation. You may also find that on windy days, spot adhering the vapour retarder with adhesive will help to keep the vapour retarder from blowing off the deck while the roof is being installed.
On some single ply roofs, the vapour retarder specified consists of a heavy gauge polyethylene sheet that is loosely laid on the deck.
These membranes are typically installed as follows:
- Unroll the polyethylene sheet and loosely lay over the deck.
- Ensure that edges are lapped a minimum of 75 mm (3 in) and end laps 150 mm (6 in). On steel decks, ensure that all edge laps are centered over the top bearing flange of the deck rib.
- Lift and fold back the edge lap (approximately 300 mm (12 in)).
- About 12.7 mm (1/2 in) in from the edge of the bottom sheet, apply a strip of double- sided butyl tape, or a bead of sealant specified by the membrane manufacturer.
- Carefully fold the top sheet into position and firmly press down the laps. Ensure that there are no fish mouths or wrinkles.
- Some manufacturers also have purpose-made tapes designed to seal the exposed leading edge to the underlying material.
- Repeat the process at the end laps.
- Extend the membrane up vertical surfaces a minimum of 150 mm (6 in) onto the surface of the insulation to facilitate sealing to the roof membrane.
 Two Ply Hot Applied Vapour Retarder
A two-ply hot applied vapour retarder is mopped down with hot asphalt applied at a rate of 1 kg/m² (20 lb/square). Two ply vapour retarders commonly consist of two layers of #15 perforated asphalt felt or two layers of Type IV or VI glass felt as the membrane reinforcement, which are embedded in hot asphalt. The steps for installing a two-ply hot applied vapour retarder as follows:
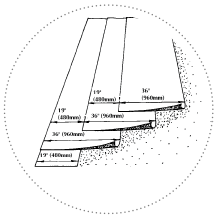
- Embed a 480 mm (19 in) wide roll of reinforcement in hot asphalt.
- Starting at the low point, at right angles to the slope, embed a 480 mm (19 in) roll of reinforcement in a full mopping of hot asphalt.
- Apply asphalt at a rate of 1 kg/m² (20 lb/square).
- Ensure that the felt extends up all walls, curbs and parapets and that it is at least 125 mm (5 in) higher than the thickness of the insulation being used.
- Embed a 900 mm (36 in) wide roll of reinforcement in hot asphalt.
- Lay a 900 mm (36 in) wide roll of reinforcement in a full mopping of asphalt (over top of the previously laid 480 mm (19 in) roll). All plies must extend up the sidewalls.
- Firmly press the layers of reinforcement in tight at the corners and side walls so that the vapour retarder fits the contour of the roof structure.
- Embed rolls of reinforcement until the deck is covered
- Install rolls of 900 mm (36 in) reinforcement until the entire deck is covered. Overlap each previous layer by 480 mm (19 in) to ensure two ply coverage of the entire deck.
Note: Two ply hot applied vapour retarders reinforced with #15 organic felt must be either covered with insulation and membrane or with a thin glaze coat f hot applied asphalt bitumen within the same work period and/or prior to the onset of inclement weather.
Pressure Sensitive (Self Adhesive) Modified Bitumen Vapour Retarder
Pressure sensitive modified bitumen vapour retarder membranes, also referred to as “self-adhesive” membranes, are typically a thin layer of SBS modified asphalt bitumen formulated to be tacky at working temperatures that is either internally reinforced or that is applied to a woven plastic film external reinforcement. These membranes are typically fully supported although some can be applied to directly to steel roof deck.
The typical pressure sensitive vapour retarder application would include:
- Deck preparation
- Application of primer to the cleaned deck surfaces.
- Priming of new steel roof deck surfaces may not be required, consult the manufacturer’s written instructions.
- Membrane installation
- Starting at the low point and moving upslope, position the membrane on the deck with 75 mm (3 in) minimum side laps and 150 mm (6 in) or as required by the membrane manufacturer.
- For steel decks, the side laps should be positioned over the deck flute for support, end laps should be supported by 150 mm (6 in) wide sheet metal plates.
- Removed the film from the underside the membrane by peeling at a 45-degree angle while holding the sheet in position in accordance with the manufacturer’s instructions.
- Roll the membrane into place with a weighted roller in the field of the roof and with hand rollers on seams and vertical surfaces.
- Extend the membrane up vertical surfaces a minimum of 150 mm (6 in) above the surface of the insulation to facilitate sealing to the roof membrane.
Cold Adhesive Adhered Modified Bitumen
Cold adhesive adhered modified bitumen vapour retarder membranes are typically SBS modified bitumen base sheets with sanded top and bottom surfaces that incorporate internal glass fibre, non-woven polyester or composite reinforcement. These membranes are typically fully supported by a continuous roof deck or by a support panel secured to a discontinuous roof deck (i.e. glass matt gypsum board mechanically fastened to a steel roof deck).
The typical cold adhesive adhered modified bitumen vapour retarder application would include:
- Deck preparation
- Application of primer to the cleaned deck surfaces.
- Apply primer if and as required by the manufacturer’s written instructions.
- Membrane installation
- Starting at the low point and moving upslope, position the membrane on the deck with minimum 75 mm (3 in) side laps and 150 mm (6 in) or as required by the membrane manufacturer.
- Reroll the membrane and apply the adhesive at the rate and using the method recommended by the material manufacturer taking care to not apply adhesive to the side laps where they are to be heat sealed.
- Roll the membrane into place and broom the membrane surface to remove any blisters.
- Roll the membrane with a weighted roller in the field of the roof and a hand roller on vertical surfaces to bring the membrane into full contact with the adhesive as recommended by the membrane manufacturer.
- Heat seal side and end laps are recommended by the membrane manufacturer.
- Extend the membrane up vertical surfaces a minimum 150 mm (6 in) above the surface of the insulation to facilitate sealing to the roof membrane.
Torch Applied Modified Bitumen
Note: Torch applied modified bitumen membranes, including vapour torch applied modified bitumen vapour retarders, are only to be applied appropriate non-combustible, heat tolerant substrates. combustible surfaces must be covered with an appropriate separation material.
Torch applied modified bitumen vapour retarder membranes are typically SBS modified bitumen base sheets with a poly film bottom surface and a sanded top surface that incorporate internal glass fibre, non-woven polyester or composite reinforcement. These membranes are typically fully supported by a continuous roof deck or by a support panel secured to a discontinuous roof deck (i.e. glass matt gypsum board mechanically fastened to a steel roof deck).
The typical torch applied modified bitumen vapour retarder application would include:
- Deck preparation
- Application of primer to the cleaned deck surfaces.
- Apply primer in accordance with the manufacturer’s written instructions.
- Membrane installation
- Starting at the low point and moving upslope, position the membrane on the deck with 75 mm (3 in) minimum side laps and 150 mm (6 in) or as required by the membrane manufacturer.
- Reroll the membrane and apply heat with an appropriate torch or hot air welding device to liquify the bitumen on the underside of the sheet as it is brought into contact with the supporting surface, including heat welding the side and end laps all in accordance with the manufacturer’s written instructions.
- Extend the membrane up vertical surfaces a minimum of 150 mm (6 in) above the surface of the insulation to facilitate sealing to the roof membrane.
Composite Modified Bitumen Membrane Panels
Composite modified bitumen membrane panels typically consist of a sanded topped modified bitumen base sheet factory laminated to a thin support panel. A variety of materials are used for the support panel component including fire retardant fibreboard, glass matt faced moisture resistant gypsum board and glass matt faced high density polyurethane insulation. These systems can be installed over both continuous and discontinuous roof decks provided that the support panel has adequate strength and is rated to span the discontinuities.
The typical composite panel modified bitumen vapour retarder application would include:
- Deck preparation
- Cleaned deck surfaces.
- Membrane installation
- For mechanically fastened applications:
- Starting at the low point and moving upslope (to set laps to shed water), position the panel on the deck with the factory side laps set to shed water. End laps are typically butted and aligned to facilitate covering with cover strip.
- Mechanically fasten the panels to the roof deck with approved screw and plate fasteners installed at the rate required to achieve the required wind uplift rating.
- Add additional screw and plate fasteners in the field of the panel if required to meet the required wind uplift rating.
- Seal the side laps using the factory included pressure sensitive lap and/or the heat welding technology. Apply heat welded membrane cover strips, typically 300 mm (12 in) wide over the end laps and membrane cover patches heat welded over fasteners in the field of the panel.
- For adhered applications:
- Apply the adhesive to the cleaned (and primed if required) surface of the deck and position the panel on the deck with the factory side laps set to shed water. End laps are typically butted and aligned to facilitate covering with cover strip.
- Seal the side laps using the factory included pressure sensitive lap and/or the heat welding technology. Apply heat welded membrane cover strips, typically 300 mm (12 in) wide over the end laps and membrane cover patches heat welded over fasteners in the field of the panel.
- Extend the membrane up vertical surfaces a minimum of 150 mm (6 in) above the insulation surface using pressure sensitive, cold adhered, or heat welded membrane similar to that used in the composite panel to facilitate sealing to the roof membrane.
- For mechanically fastened applications:
Preventing Bleed-through
Through the course of a day during warm sunny weather, the surface of a roof system may be 37.8 °C (100ºF) warmer than the actual outside temperatures. The warming of the roof system may cause some types of adhesives or asphalts (Type 1 or pitch) to reach their flow temperature and these products could seep through the roof deck causing interior damage.
During cooler months, the loss of heat through the roof system could cause the same problems around heat sources such as hot chimneys. Excessive use of asphalt and adhesives during the application could cause immediate problems, as these products continue to move as they cool or flash off.
The various types of decks can be treated to prevent the running and bleed-through of asphalt and adhesives by the following means:
Wood – application of a slip sheet sheathing paper or #15 felt nailed in place. Lap felts with a minimum side lap of 75 mm (3 in).
Concrete – Vented base sheet, base sheet, or #15 felt mopped to the deck with a minimum 75 mm (3 in) side lap.
Steel – Gypsum board, or cementitious board mechanically fastened to the deck with the joints staggered and taped, or ship lapped.
In all cases, the installation of a continuous unbroken vapour retarder will help prevent bleed-through related to the components above the vapour retarder. Tightly butted, staggered and ship lapped insulation can also limit the amount of bleed-through. The ends of the vapour retarders should always be wrapped (folded over) the insulation along the roof perimeter to maintain a continuous vapour retarder and prevent asphalt from seeping through at the upturns of walls and curbs.
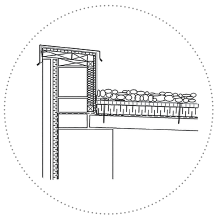
Roof Edges and Terminations
It is important that the continuity of the vapour retarder be maintained. In order to do this, a strip of double-sided tape, or a bead of sealant must be applied to seal the roof vapour retarder to the adjacent vapour retarder systems at all transitions of walls and curbs and the roof.