Hips and ridges may be capped using either strip shingles cut in thirds or shingles manufactured for this purpose.
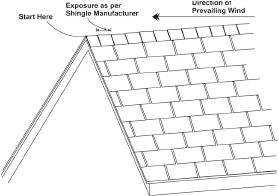
Start hips at eaves. Start ridges at the end away from the prevailing wind direction.
Bend each shingle so that it will extend an equal distance from each side of the hip or ridge. Apply each shingle so as to overlap the previous one and leave an exposure as recommended by individual manufacturers. Do not leave any exposed nails.
A straight and neat ridge will improve the appearance of any shingle roof. Fortunately, applying a good, professional ridge is relatively easy. First trim the shingles back out of the way so that there is no hump in the ridge. At the very bottom of the hip place a tab and nail it in place. On a new roof use nails 32 mm (1 1/4 in) long. On a reroof job the nails should be 38 mm (1 1/2 in) long. Now trim off the corners of the tabs at the bottom and place a 3d galvanized nail so that you can anchor the end of the chalk line. Stretch the line on up to the top of the hip. You will use this line as a guide for aligning the ridge shingles. Using another ridge tab, estimate where you want the chalk line. Be careful when you snap the line that the wind does not blow the line to one side. Always raise the line straight up but not too high.
After snapping the line, you are ready to start ridging. Start at the bottom and sit on the same side of the ridge as the chalk line so that you can align the tabs easier. The ridge will look much smoother if you nail about 50 mm (2 in) above the factory adhesive. If you pre- bend the ridge shingles, they will be much easier to lay straight. If the temperature is too cold, pre-bending the tabs may not be possible because they will break in the middle. In cold weather, you should lay the tab on the line, nail that side and then bend the tab over the ridge. If they still break, you may have to wait until warmer weather to apply the ridge, or store the shingles in a heated area just prior to use. Do not try to stretch the ridge shingle exposure out too far. The ridge should have the same exposure as the field exposure.
If you have to cut ridge shingles from 3-tab shingles, you will probably need about four bundles for the average hip roof. This will be a lot of cutting so you should simplify and systematize the job as much as you can. Four bundles are about 107 shingles and each shingle must be cut in six different places. Therefore, 642 cuts are needed just for four bundles of shingles. To start out, you need a work bench or an area that is a comfortable height for work. The tailgate of a pick-up truck will serve nicely. Tear the wrapper off the first bundle of shingles and pick it up with the tabs away from you and the granule side up. If you are right handed, drop the left end of the bundle from about 300 mm (12 in). This will break the shingles loose on that end. Now hold your left hand on top of the bundle at the left end and let the other end fall. This will finish breaking the shingles loose and will also stagger the shingles so they will be easy to cut. Now cut off a slight amount at an angle, as in pre-bending the shingles about four or five minutes, providing that you use a sharp hook blade.
Cutting off this excess is necessary if you are to install a neat ridge on a hip roof. For the ridge at the top of a gable roof, it will not be necessary to cut the shingles in this manner. Instead, make two straight cuts on each shingle, directly below the cut-outs. Hold down firmly on the tab that you are cutting. Now you are ready for the second cut. As you cut each shingle, hold down on the top left corner of the tab. After each cut, simply toss the tab out of the way. As you toss each tab, try to make a halfway neat stack, but don’t waste a lot of time doing so. Now you can make the third cut which will be the same as the first.
Any junction in the ridge should be clean cut and free of humps. Any face nailing should be done only at open cuts when needed and with a galvanized finishing nail. This is often referred to as “pin nailing”. Before ridging a T-lock roof, be sure that all the tabs have been installed wherever necessary at the top and on the hips. This is necessary in order to complete the double coverage of the roof and also to cover the nails in the shingles. On a 3-tab roof you can sometimes use the scrap from a valley to fill in where it is needed on a hip.
Before ridging, make sure that excess shingle has been trimmed back from the hips and at the top. If a portion of shingle is left on a hip, it will cause a hump and leave one side of the ridge crooked. This is because when you lay one side on the chalk line, the shingles that are going over the hump will not reach as far as the other shingles.
Always nail the ridge on the upper portion of the shingle so that the next shingle will cover the nails. This is called blind nailing. Face nailing, nailing in the exposed portion, will result in the nails rusting and working loose. There is no reason to face nail the ridge, especially when you are using self-sealing shingles.
When you are ridging a dormer, bring the ridge to the main slope so that the shingles will lap the right direction.
When you install the new ridge, the second and third shingle will not lay down smooth. There will be a gap under the tabs. This gap is sometimes referred to as “fishmouth”. Eliminate this build-up by removing the first three or four shingles at the bottom and trimming 75 mm (3 in) off of the starter course.