With asphalt shingle roof systems, there are three methods of valley construction: open valley, closed-cut valley and woven valley. For any method selected valley flashing must be in place before shingle application is begun.
With all types of valley construction, valley underlayment must be in place before valley construction can begin. To install underlayment in a valley first center a 1 m (39 in) wide strip of asphalt saturated felt, self-adhering underlayment or polymer-modified bitumen sheet in the valley and secure with enough nails to hold in place. Trim horizontal courses of underlayment to overlap valley strip by a minimum 150 mm (6 in).
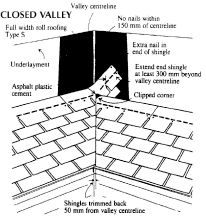
Closed (cut) Valley

With valley underlayment in place, apply the first shingle course along the eaves of one roof plane and across the valley. For proper water flow start shingle application on roof plane that has the lower slope or lesser height. Extend the end shingle a minimum 300 mm (12 in) onto the adjoining roof area. Apply succeeding courses in a similar fashion. Press shingles tightly into valley center. Nail normally, except ensure that no nail is within 150 mm (6 in) of valley centerline. Secure the end of the shingle crossing the valley with two nails.
Apply shingles on the adjoining roof plane. Start along the eaves and cross the valley onto the previously applied shingles. Trim the shingles being applied no less than 50 mm (2 in) back from the valley centerline. Clip 25 mm (1 in) from the upper corner of each end shingle to direct water flow into the valley. Embed each end shingle in a 75 mm (3 in) wide strip of plastic cement.

Open (Smooth) Valley
Flashing material for open valleys shall be corrosion resistant metal (recommended) or mineral surface roll roofing. Metal valley flashing should not be less than 600 mm (24 in) wide.
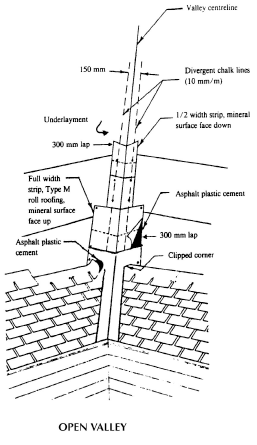
After valley underlayment has been installed, center the metal valley flashing (or mineral surface roll roofing). Secure the metal valley flashing by nailing on 300 mm to 450 mm (12 in to 18 in) centers without puncturing the metal. This can be achieved by nailing so that nail shanks are adjacent to the metal edge with the nail heads overlapping and securing the flashing in place. If more than one piece of metal flashing is required overlap in the flow direction by 300 mm (12 in) and embed in plastic cement.
Snap two chalk lines on the valley flashing, one on each side of the valley, 100 mm (4 in) from each edge starting at the bottom of the valley and tapering inside at a rate of 10 mm/m (1/8 in/ft). As shingles are applied toward the valley, trim the last shingle in each course to fit on the chalk line. Do not use a shingle less than 300 mm (12 in) to finish a course running into a valley.
Clip 25 mm (1 in) from the upper corner from each end shingle at a 45-degree angle to direct water into the valley and prevent water ingress between courses. Cement the shingle to the valley flashing with a 75 mm (3 in) width of plastic cement. There should be no exposed nails along the valley flashing.
Failure to trim these corners is one of the biggest reasons for roof leaks. Any water that runs against an edge of a shingle will hit a sharp corner and run along the top of the shingle until it finds a place to leak through the roof. Sometimes the water will run for many feet before it finds an opening in the felt underlay. Trimming off these corners is referred to as “dubbing” the corners. Once the water gets under the shingles it can cause a leak almost anywhere.
Some roofers may not understand the importance of trimming these corners because they are never called back on their leaks.
When you trim out and “dub” the corners, you are actually building a trough for the water to flow down to the eave. Therefore, you must center this trough so that the water will run in the center of the valley. When reroofing on composition shingle roof, there will be enough loose granules in the valley to help you to determine the exact center. You can either raise the shingles and look or you can cut back the excess shingle until you reach the center and then mark where you want to cut. A nice width for a valley is about 300 mm (12 in) at the top and slightly wider at the bottom. It is important to cut the shingles at both sides of the valley neatly and to keep the sides straight.
A smooth valley cannot be used on every roof. It should not be used in a curved valley or where you will have a larger amount of water entering the valley from one of the two slopes. Also, it should not be used if the structure of the valley, where the roof decks join, does not form straight V shape the full length of the valley. If there is an irregularity in the slope of the roof surface, there will be a hump in the valley that will probably detour the water under the shingles and cause a leak. The double layer of 41 kg (90 lb) roofing, when applied correctly, is approved by most building codes. However, the most widely used material for smooth valleys is sheet metal. It comes in standard lengths of 2.4 m (8 ft) and 3 m (10 ft) and is available in a variety of colours and finishes. Regardless of the colour of the shingles, you can usually get metal or 41 kg (90 lb) roll roofing in the same colour.
Woven Valley
This is one of the oldest types of valleys. This valley requires no trimming. The shingles are laced back and forth up the slope. Normally, when both slopes are the same pitch, there will be an equal number of shingles on each slope.
With valley underlayment in place begin shingling simultaneously from both roof planes. Apply shingles along eaves of one roof area and across valley extending the end shingle a minimum of 300 mm (12 in) onto the intersecting roof. Apply courses alternatively from adjoining roof areas weaving the shingles together.
Press each shingle tightly into the valley and nail as for closed valleys.
 When you shingle up the valley, on the first slope you must leave the shingles loose in the valley so that you can slip shingles in when you shingle the other slope. The shingles in the valley should always be whole shingles. When a shingle ends in the valley, slide a whole shingle over toward the valley and nail on a single tab or maybe a two-tab shingle in the gap between whole shingles. Having whole shingles in the valley area is important because there should be no joints in the valley. Water will run under the tabs and leak through a joint. If there is any doubt about a joint being too close to the valley, raise the tab and seal the joint with plastic cement.
The main objection to a woven valley is that the appearance lacks the professional look. There is nothing neat about it and many homeowners would prefer not to have this type of valley on their house. Also, in a woven valley, it is very difficult to find and repair a leak.