The intersection of shingle roofs and vertical walls or chimneys shall be protected with sheet metal flashing.
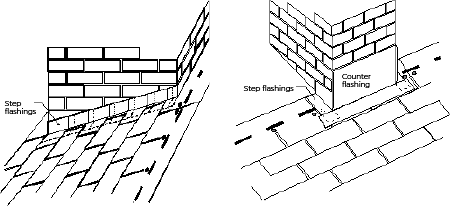
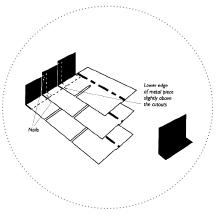 Step flashings are rectangular in shape and 75 mm (3 in) longer than the exposed face of the roofing shingles. They are bent so as to extend out a minimum of 100 mm (4 in) over the roof deck and 100 mm (4 in) up the wall surface. Each flashing piece is placed just uproof from the exposed edge of the shingle which overlaps it and is secured to the roof deck with one nail placed in the corner. Each element of the flashing will lap the next by a minimum 75 mm (3 in). A sheet-metal counterflashing is then attached to the wall substrate to cover and protect the top of the step flashing from water intrusion. Alternatively, wall cladding may perform the counterflashing function, for example, the finish siding is brought down over the step flashing to serve as counterflashing.
Where a roof slopes downward from a wall or chimney, an apron flashing is attached to the masonry wall and shall extend over the shingles. Where a roof slopes upward from a wall or chimney, a backer or cricket flashing is installed at the transition. A cricket is recommended if the wall or chimney is more than 600 mm (24 in) wide. A cricket frame constructed from wood panel sheathing is fastened to the roof deck and covered with soldered or riveted and sealed sheet-metal cricket flashing. A backer or cricket flashing shall extend up the slope under the shingles to a point equal in height to the flashing on the masonry but not less than 1.5 times the shingle exposure.
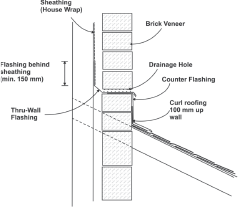
Counter flashing shall be embedded a minimum 25 mm (1 in) into the masonry with a turn back waterstop, and it shall extend a minimum of 150 mm (6 in) down the masonry and lap the lower flashing by at least 50 mm (2 in).
The point where the roof surface joins the chimney is one of the most common areas for leaks to develop. Fortunately, stopping leaks here is not difficult. A few simple precautions will prevent most leaks. Always be careful about the application and the selection of the material to be used. A metal flashing can be custom made by most sheet metal shops. All that is needed is the roof pitch and the width measurement. Proper installation is still important to ensure a watertight roof. The roofer must shingle under the bottom edge properly so that the water will run out onto the roof. The valley portion must be trimmed so that there is a water trough in the valley where the water can run smoothly, and the corners of the valley shingles must be “dubbed” (have the exposed corners clipped).
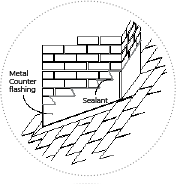 The sides of the chimney should be flashed with sheet metal. This can be installed as you shingle around the chimney, but it is easier to put the metal in after shingling is completed. Go ahead and shingle this small area, leaving out any nails in the shingles where the metal is to be installed. Chalk a line on the shingles about 6 mm (1/4 in) from the edge of the wood opening or chimney, and then cut the shingles on the line. Now go back down to the bottom of the chimney and start installing the metal flashing.
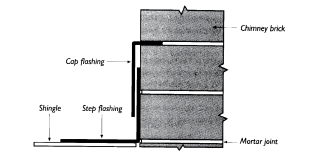
The corners can be a soldered one-piece unit, but usually the roofer has to make the corners watertight by making neat and exact cuts, and locking the seams. Always use a good grade of caulking such as butyl rubber sealant to seal any unsoldered corners. Overlap each piece of metal at least 50 mm (2 in). This metal flashing should extend out onto the shingles at least 100 mm (4 in) and turn up about 100 mm (4 in) so that the counter flashing will be able to lap down over it with at least 75 mm (3 in).
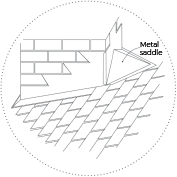 Any time that the horizontal width of the chimney is over 600 mm (24 in), you should install a metal cricket saddle flashing. The roofer or carpenter should build a wooden cricket. The cricket should have the same pitch as the main roof. The bottom of the cricket, where the valley comes down against the chimney, should never be pointed. Instead, the bottom edge should be about 100 mm (4 in) wide so that a water trough can be formed in the valley.
In this location, water will come off the roof in a larger volume and with more force and the valley is to be designed to direct water downward immediately. With a smooth valley, the water will rush under the shingles on the cricket and could pass through the roof. Always be careful when you shingle the cricket to see that no nails are driven into the metal valley more than 50 mm (2 in) from the outside edge of the metal. When installing the metal valley, place one foot in the center at the bottom to hold it down in position while you nail the edges. Not all fireplaces and chimneys present the same problems to the roofer. However, the chimneys illustrated cover most situations. Remember that neatness and thoroughness are key to making a watertight chimney joint.
When reroofing, it is almost always better to use new metal flashing and install it up under the existing metal counter flashing whenever possible. However, in many cases, you won’t be able to do so and you must do the best that you can under the circumstances.