“Butting-up” is the term used to describe the offset of the overlap on a reroofing job. This offset is required when installing a strip shingle over another strip, or wood shingle roof with an exposure of 139 mm (5 15/32 in) or less. Some roofs have an exposure of less than 139 mm (5 15/32 in) and if you try to roof over them you must butt-up the shingles to achieve a smooth finish. When butting-up the only shingles that you will need to gauge are the last two courses at the top. The horizontal lines will be exactly the same as the old roof.
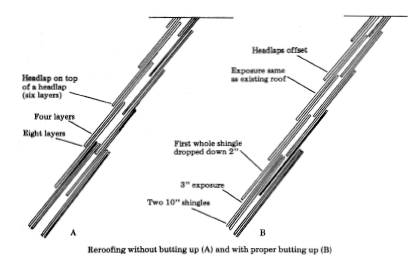
When applied correctly, three-tab shingle roof systems will include a 50 mm (2 in) headlap. If you reroof over an existing roof without using the “butt-up” method you will be placing the overlap directly over the overlap of the roof below. The result will be roof that is very uneven. It will get even worse when the sun has softened the shingles, which will allow the layers between the headlaps to sag down. Not only is this very unsightly, but the shallow valleys formed in the sagged areas may even pool enough water to cause the roof to leak.
Starting A Butt-Up Reroof
The correct way to start a butt-up reroof is the same no matter what pattern you use. First you must prepare the old roof. The old ridge cover should be removed, especially the hip and ridge covers. Now trim back the old shingles around the edges and apply the metal edging. Regardless of what pattern you use, the following procedure will always apply when you reroof over a 3-tab, strip or wood shingle roof.
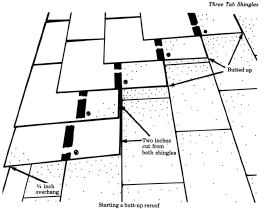
The Asphalt Roofing Manufacturers Association (ARMA) recommends that the starter course be cut from a self-sealing shingle, cutting off the tabs plus an additional 60 mm (2 3/8 in) from the top, leaving a 139 mm (5 15/32 in) portion of shingle. Place this strip at the bottom with the granules face up and the factory adhesive at the edge. Make sure that this strip does not lap upon the second course of shingles of the existing roof. The first shingle must have 50 mm (2 in) cut off of the top and laid directly over the 139 mm (5 15/32 in) starter course, keeping the bottom edges even and offsetting each other 139 mm (5 15/32 in).
From here on all that you do is shove the new shingles up against the butts of the old shingles. When you get to the top you will need to gauge the last two shingle courses. If the old shingles are not square with the ridge, you can chalk a line for the last two courses so that the last shingle will be even with the ridge. This is very important when you reroof over rough asphalt shingles or wood shingles.
When you nail in the normal position you will always be nailing just below the butts of the old shingles. After the four nails have been driven properly there may still be one or two humps left because of the warped shingles. Go ahead and drive a nail in the humps so that the roof will be smooth. Be careful that you do not nail too close to the area where a bond line will fall on the next shingle above. If you do nail at a bond line you should cover the nail with a small amount of plastic cement so that there will be no future leaks result of this nail.
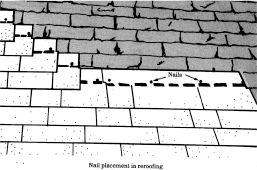
Over wood or rough asphalt shingles you should nail high enough so as to penetrate the
tabs of the old shingles. This will permit the nails to serve an important secondary purpose,
to pull down warped or curled shingles. The new shingles will lie down much better and
form a better seal as a result of this nailing procedure.