 Shingles vary in size, installation method, exposure etc. and there are also several correct ways to install them. The shingle manufacturer should be consulted for specific requirements for each type of shingle.
Asphalt shingles are designed for application in overlapping courses that are installed in horizontal runs, perpendicular to the roof slope direction. Each course laps the one below by a distance equal the exposure size plus headlap. Most asphalt shingles are intended for installation with a 50 mm (2 in) headlap. In a properly installed asphalt shingle roof system, the headlap ensures robust watershedding performance as well as placement of two row of fasteners through every shingle.
In determining the amount of horizontal course offset, the first course of shingles starts with a full shingle and succeeding courses start with portions removed according to the style of shingle being installed and the pattern desired.
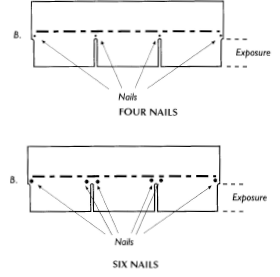
Generally, a minimum of four nails per strip shingle is required in accordance with manufacturers’ recommendations for placement, spacing and exposure. In areas of high wind exposure, additional fasteners may be required.
Install variable butt line shingles according to manufacturer’s instructions to obtain correct exposure. Do not use an alignment system where shingle joints are closer than 100 mm (4 in) to one another.
Sound workmanship requires that you plan the job carefully. The information on the following pages should help you select the pattern, application method and material that is correct for your job.
9.1.2.1 Stair Step Method
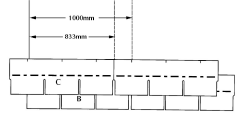
Starting a roof with a 167 mm (6 9/16 in) pattern and stair stepping it in is probably the most widely used roofing method. To start this pattern, you will need two vertical chalk lines 167 mm (6 9/16 in) apart.
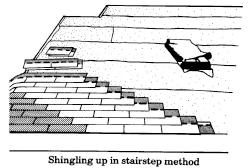
Measure in from the rake 835 mm (32 7/8 in) and 1000 mm (39 3/8 in) leaving the end of the tape measure sticking out over the edge 19 mm (3/4 in) to allow for the shingle overhang. This means that your lines are actually 814 mm (32 1/16 in) and 980 mm (38 19/32 in) from the edge of the wood or metal edging. First you should measure at the top near the ridge and place a nail at 835 mm (32 7/8 in) and 1000 mm (39 3/8 in). Now measure at the bottom and mark the same. By hooking your chalk line on the nails at the top you can now chalk the two lines. Make sure that you hold the chalk line tight and always raise the line straight up so that you produce a straight line between the nails. Don’t raise the line too high in a strong wind because the line will blow to one side and leave a crooked line.
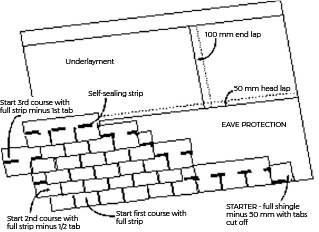
Starter Strip
The purpose of the starter strip is to provide a back-up for the first course of shingles and fill in the spaces between the cutouts.
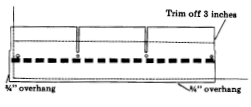
A prepared starter strip should be at least 225 mm (9 in) wide and include an adhesive strip. If no factory-applied adhesive is present, the first course should be hand tabbed to the starter course. Starter course end joints and first course should be offset a minimum of 125 mm (5 in). First trim about 75 mm (3 in) from the tabs. This eliminates a build-up of shingle thickness where the third shingle will overlap the second shingle. Cut away ½ of the first tab to ensure that the joints of the overlying shingles are not superimposed over the joints of the starter shingle. Lay the first starter shingle, with the cut edge and granule side up on the 1000 mm (39 3/8 in) line. Hook your index finger over the bottom edge of the shingle. With the tip of your finger on the wood of the eave, the edge of the shingle should come to the first joint in your finger. This will be about 19 mm (3/4 in). Now check the overhang on the rake. If you have the 835 mm (32 7/8 in) line in the right place you will have a 19 mm (3/4 in) overhang here also. Where a T-type metal drip edge is installed, the first course may be installed flush with the drip edge. Lay the next starter shingle to the side of the first. Adjust the bottom edge with your finger. Install the rest of the starter course in the same manner. Nail the starter course in place, driving the nails as shown, ensuring that they are not exposed in the cutouts of the first course of shingles.
For convenience, most three-tab shingles have alignment slits positioned at the exact midpoint of the tabs. Cutting from the slit will ensure that precisely half the tab is cut away.
First Course
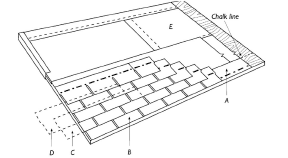
To ensure a straight horizontal line-up of the shingles, place a chalk line along the roof 336 mm (13 7/32 in) from the lower edge of the starter strip. Start at the edge of the rake and place a full shingle, with the right edge flush with the 1000 mm (39 3/8 in) vertical chalk line (shingle B). Keeping the bottom edge even with the starter course, nail. Continue with another full shingle, with the left edge placed on the 1000 mm (39 3/8 in) line alongside the first shingle B and with the bottom edge even with the starter shingle.
Second Course
Shingle C will be applied 139 mm (5 15/32 in) up from shingle B on the 835 mm (32 7/8 in) line. When placed, the edge of the underlying first shingle at the rake should line up with the alignment slit of the first tab of shingle C. Nail when properly placed. Trim the excess (½ tab) and apply another full shingle alongside C.
Third Course & Fourth Courses
The third course (D) is placed over the second course so that one full tab overhangs the edge at the rake. Once nailed, trim the excess full tab and place another full shingle alongside. The fourth course is placed over the third so that 1½ tabs overhangs the edge at the rake. Nail in place and remove the excess overhang (1½ tabs). Place a full shingle alongside and nail in place.
Succeeding Courses
When these four courses have been completed, place another full shingle with the right edge aligned at the 1000 mm (39 3/8 in) vertical chalk line. Continue this four-step operation as you work up the roof, starting with a full shingle at every fifth course. If you have placed the shingles properly, the right edge of every fifth shingle should be aligned with the 1000 mm (39 3/8 in) chalk line.
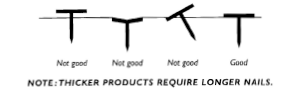
When you drive a nail, always be sure that the nail goes in straight. If the nail goes in at an angle it will probably move the shingle when you drive the nail down tight. If the nail is overdriven, it may fracture the shingle reducing the holding power. Most three-tab shingles only require four nails. However, in areas of high winds, or on steeply sloped roofs and mansards, six nails per shingle may be required.
9.1.2.2 Straight-up method
The “straight-up” method consists of laying entire vertical rows of shingles. On smaller slope areas, this method is much faster and easier than stair stepping. Caution should be used with this method, when the roof is highly visible to the eye. Using this method may lead to a shading effect, where areas of the roof appear to be different colours, if the shingles are not randomly selected. Shingles from different batches may vary slightly in their colour, so it is important to mix the bundles when you install them.
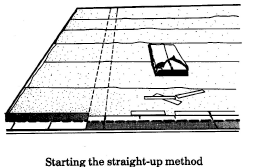
In the straight-up method the starter course is applied in the same fashion as the stair- step method. The two chalk lines at 835 mm (32 7/8 in) and 1000 mm (39 3/8 in) are laid from eave to ridge with the necessary allowance for the overhang. The shingles are placed starting with a full shingle butted to the 1000 mm (39 3/8 in) line. The next shingle is placed over the first, aligned with the 835 mm (32 7/8 in) line. The succeeding courses are laid in a similar fashion alternating with a full shingle and one with 150 mm (6 in) removed. The shingles are applied in a column straight up the roof. When laying the shingles in this manner only three nails are applied to the full shingle. The right most nail is left until the next column shingles, which are full shingles. This is to allow the lifting of the overlying tab.
On a larger slope once you get the shingles “stepped in” all the way to the ridge, the job goes very quickly. However, the bond lines tend to get out of line easier because shingles vary in length slightly from bundle to bundle.
If shingles get out of line, the best way to straighten them is to simply reverse the step- in procedure until you have all the shingles straight up and down again. Start near the bottom alongside the third shingle with a 1-tab, then lay another 1-tab above it. Alongside of the fifth and sixth shingles lay the two 2-tabs. Now you can apply whole shingles until you get back up to the top of the slope. To continue the straightening up process start the 1-tabs again at the ninth and tenth shingle. Once you get all of the shingles straight-up in one row you can straighten the bond lines.