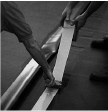
Thermoset membranes require caution during their installations. Careful attention should be taken to avoid damage or puncture during application. Proper seaming at laps is critical to prevent leakage.
- Substrates must be clean, dry, smooth, free of sharp edges, fins, loose or foreign materials, oil, grease and other materials which may damage the membrane.
- All roughened surfaces which could damage the membrane shall be repaired as required to offer a smooth substrate.
- All surface voids greater than 6 mm (1/4 in) wide shall be properly filled with an acceptable fill material.
There are three basic steps to follow when installing a thermoset roofing system.
- Lay the membrane
- Bond the seams (by glue or tape)
- Install the membrane flashing (stripping)
There are three (3) basic roof systems in which thermoset membranes can be used as follows:
- Loose-laid and ballasted
- Adhered
- Mechanically fastened
In addition, the membrane can be installed in either a conventional (membrane on top of roof insulation) or protected membrane roof assembly (membrane below the insulation). In a protected membrane assembly, the thermoset membrane is normally loosely laid over the decks or substrate.
Loose-laid Ballasted Systems
- Unroll the membrane and allow it to relax for 30 minutes. Allowing the material to relax dissipates the residual stresses that are introduced during manufacturing. This normally takes thirty minutes but can vary from manufacturer to manufacturer and with the outside ambient temperature.
- Once relaxed, position the membrane into place. Draw tight to remove any folds or wrinkles.
- Position adjoining sheets and overlap edges enough to allow for seaming. Overlaps should be a minimum of 75 mm (3 in) but will vary from manufacturer to manufacturer and the type of material.
- Depending on the type of perimeter securement to membrane can be:
- Cut flush with the parapet.
- Carried 75 mm (3 in) up the parapet or wall.
- Carried up and over the parapet.
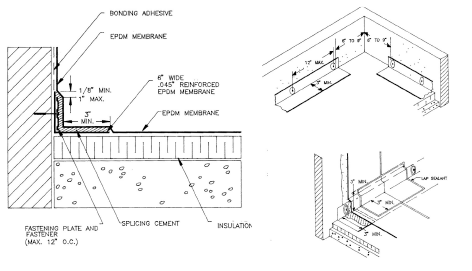
- Install the perimeter securement at roof edges, parapets, walls and large openings. There are several types of perimeter securement that can be used depending on the manufacturer’s specifications. Perimeter fastening strips consisting of reinforce membrane with a factory applied splice tape for bonding to the underside of the field membrane that are mechanically secured to the deck or perimeter curb with screw and plate fasteners is currently the most common approach for perimeter securement of EPDM roof membranes. However, membrane system manufacturers may also permit the direct securement of the membrane with plates or bars and fasteners in some instances. Perimeter fastening should be executed in strict accordance with the current requirements of the membrane system manufacturer.
- The membrane is held in place by ballast typically consisting of 19 mm to 38 mm (¾ to 1 ½ in) nominal sized round river washed stone. Crushed gravel (25 mm (1 in) clear or greater) can also be used as ballast, but a protection mat must be put down over the membrane prior to placing the gravel ballast to prevent damage to the membrane from any punctures. Ballast stone should meet the membrane manufacturers requirements for the desired wind uplift resistance with regard to size and coverage rates. It is typically required that stone ballast meet the requirements of ASTM D448 size 4, 357 or 3, with larger stone size required for heavier coverage rates. Concrete pavers can also be used as ballast.
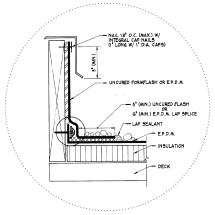 If the bar or plates are used for perimeter securement, they are fastened through the membrane and into the substrate. They must be covered by the membrane flashing or a separate strip of cured or uncured membrane. The bar or plates can be installed either horizontally (fastened down into the deck) or vertically (fastened into the wall). The choice will depend on the ease of the application and the substrate which gives the best holding power. Also, with loose-laid ballasted membranes, perimeter fastening bars should be fastened into the wall substrate. Fastening into the wall substrate reduces the potential of ballast causing damage to stripping sheets at fastener locations.
Where the reinforced membrane strip is used as perimeter membrane securement, it is normally installed under the membrane. Again, it can be installed either horizontally or vertically. The membrane is carried over the membrane strip. Splice primer/adhesive is used to bond the bottom of the roof membrane to the splice tape factory applied to the reinforced membrane securement strip. The strip is normally anchored to the substrate with approved fasteners and plates at 300 mm (12 in) o.c. or less.
Fully Adhered Systems
The fully adhered systems are often used on projects which require light weight design, are of unusual (domed, arched) shape or have special fire or wind uplift resistance requirements. Fully adhered systems can be used on decks with slopes ranging from flat to nearly vertical. However, because it is important that single ply membrane roofs drain properly, it is recommended that the roof have a minimum slope of 2%. Either reinforced or non-reinforced thermoset can be used in a fully adhered system. The installation procedure is quite similar for both.
- Roll out the membrane and position. Allow for overlaps (minimum 75 mm (3 in)). Do not use rolls wider than 3 m (10 ft). Allow the membrane to relax for at least thirty (30) minutes.
- Fold the membrane back in half. Brush off the underside to remove any talc.
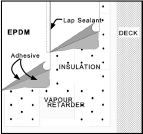 Evenly apply the specified bonding adhesive to the deck and/or substrate and/or the membrane at the rate and using the method recommended by the material manufacturer. Keep any adhesive away from the area to be lapped and seamed. The application rate will depend on adhesive type and per manufacturer’s instructions. Allow the adhesive to dry as required by the manufacturer for the adhesive type being used.
- Carefully turn down the membrane on to the prepared surface and firmly press down. Press the membrane into place with a stiff push broom or steel roller to remove any trapped air. Turn back the remaining half width and repeat the same procedure. Install the remaining membrane in the same manner.
- Install succeeding sheets in a similar fashion. (Keep adhesive off the seam areas).
- Install perimeter securement.
- Install membrane flashing.
Mechanically Fastened Systems
Mechanically fastened systems are often used on flexible decks which require light weight design, where possible movement is expected, or on projects that have specific wind or fire resistance requirements. Mechanically fastened systems can be used on decks with slopes ranging from flat to nearly vertical. However, because it is important that single ply membranes drain properly, it is recommended that the roof have a minimum slope of 2%. Reinforced membranes can be used in mechanically fastened systems.
The two major types of fastening systems are battens placed in the seams or disks placed in the seams. Reinforced membrane must be used.
Batten in the Seam System
- Unroll the membrane allowing for overlaps. Let the membrane relax for a minimum of 30 minutes.
- With the batten in the seam system, the overlaps must be wide enough to allow the membrane edge to project past the edge of the batten by at least 75 mm (3 in).
- Install the batten strips centering in the lap and fasted 300 mm (12 in) o.c. Closer fastener spacings may be required at perimeters and corners to address higher wind uplift pressures.
- Place adjoining Thermoset sheets overlapping enough to cover the batten strips and seaming of the laps.
- Seam laps as recommended by the manufacturer.
- Install membrane flashing.
Mechanical (Batten) Systems
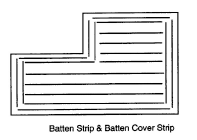 Some manufacturers allow for use of wider membrane sheets by placing battens in the field of the sheet and covering them with membrane batten covers. When using a mechanically fastened system, temporary weights will be required to hold the membrane in place until the battens are installed.
- Unroll the sheet in the largest size possible overlapping sheets a minimum of 75 mm (3 in). Allow the sheet to relax a minimum of 30 minutes.
- Seam sheets in accordance with the manufacturer’s instructions.
- Upon completion of the laps install the fastening strips. Place fasteners, starting from the end of the batten strip and every 300 mm (12 in) along the strip. The spacing of the fastener strips vary with manufacturer and site specific wind uplift pressures ranging from 750 mm (2 1/2 ft) apart at perimeters to 2.1 m (7 ft) apart in the field of the roof. Carefully follow the manufacturer’s instructions for spacing and fastening the battens.
- Apply a 19 mm x 8 mm (3/4 in x 1/3 in) thick spot of membrane sealant over and around each fastener head or use alternative methods to protect the membrane over the fastener heads as required by the membrane manufacturer.
- Over the strips, center a 200 mm (8 in) wide roll of pre-taped cured membrane cover strip and splice to the main membrane as per lap sealing instructions.
- Install perimeter securement.
- Install membrane flashings.
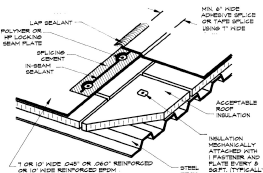
Mechanically Fastened – Reinforced
- Unroll membrane sheet and position without stretching. Allow membrane to relax for at least 30 minutes.
- Lap end and side laps in accordance with the membrane manufacturer’s instruction (minimum 150 mm (6 in)).
- Install seam plates centered within the side laps. Fasten with screws into the deck. The spacing of the plates and screws will vary with the width of the sheets used and the design requirements. Follow the manufacturer’s instructions for the seam layout and fastener spacing requirements for the project.
- Install perimeter securement.
- Install membrane flashing.
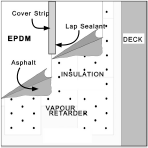
Fleeced Backed – Mopped Systems
In general, thermoset roofing membranes cannot be mopped down to the deck or substrate as contact with bitumen causes the membrane to swell and lose its elasticity. Some manufacturers have overcome this problem by producing a membrane with a factory laminated fleece backing. This membrane can be mopped directly to the deck, or suitable insulation with moppings of asphalt heated to temperatures typically below those used for BUR application. The rolls are normally available in 3 m (10 ft) widths.
All decks and substrates to receive the membrane must be clean and dry. Ensure that plywood decks are securely fastened to structural supports. If nailed, provide protection such as a thin layer of suitable insulation mopped over the deck.
 Starting at the low point of the roof, unroll the membrane and Ensure a tight butt-edge with adjoining sheets. Do not overlap.
- Fold back membrane halfway. Apply a mopping of
Type 3 asphalt at the specified rate (Typically 1.0 to 1.3
kg/m2 (20 to 25 lb/square)) to the substrate immediately
ahead of the roll. - While asphalt is still hot, roll the membrane into it. Brush
out all wrinkles and air bubbles with a stiff push broom. - Roll back other half of membrane and repeat the process.
- Seal seams in the membrane by applying overlay tape, centered over the joint.
- Complete membrane flashings.
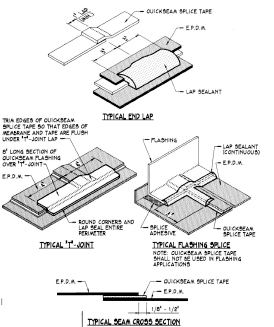
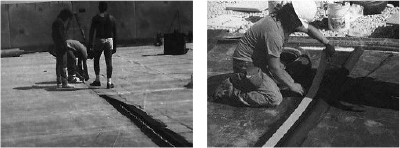
Overlaps and Seams
The proper bonding of overlaps and seams is crucial for ensuring a watertight roof. Currently, the industry uses taped seams almost exclusively although glued seams are sometimes still used for particular details or applications.
Splice Tape
Using splice tape instead of adhesive at laps is an option provided by some manufacturers. Although the preparation of the seams is similar the actual application varies slightly. To install a taped seam:
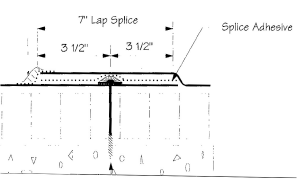
- Position the sheet at the splice area and overlap a minimum of 125 mm (5 in).
 Once the membrane is in place mark the bottom sheet 12.7 to 19 mm (1/2 to 3/4 in) from the edge of the top sheet every 1.2 to 1.8 m (4 to 6 ft) with a carpenter’s crayon. Fold back the top membrane at the splicing area. The splice cleaner can sometimes be used to temporarily tack the membrane at 1.5 m (5 ft) intervals.
- Remove all dust and talc from the surface of the sheet with a stiff broom. Clean the splice area (both mating surfaces) with recommended cleaner/primer/adhesive in a similar fashion to a glued seam.
 Position splice tape (with release paper intact) on the bottom sheet, aligning the edge of the release paper with the markings. Immediately roll the splice tape with a hand roller.
- When the tape has been installed over the entire seam length allow the top sheet to rest on top of the paper backing. Trim the top sheet as required to ensure that 3 to 6 mm (1/8 to 1/4 in) of the tape is exposed on the finished splice.
 Once you are sure the top sheet is properly aligned roll back the top sheet and remove the paper backing from the tape by pulling against the weight of the bottom sheet at approximately a 45° angle and parallel to the roof surface. Allow the sheet to fall freely on to the tape.
- Broom the entire length of the seam as the release paper is being removed.
- Roll the splice using the recommended hand roller, first across the splice and then along the entire length.
- Apply lap sealant if required by the manufacturer.
Note: When the seam is longer than the roll of tape, overlap the tape a minimum of 25 mm (1 in) at joints. Mark these joints and install “T” Joint cover.
Glued Seams
Two things are critical for getting a good bond in an adhesive-bonded seam. The first is that the mating surface of the membrane must be clean and second, the correct quantity of adhesive must be used.
- After the membrane has been laid out fold back the top sheet 300 mm (12 in) to allow for cleaning. Clean the mating surfaces of both sheets with a clean, lint free cotton cloth soaked in the cleaner or use other materials and methods for seam cleaning as recommended by the membrane manufacturer. Proper cleaning has been achieved when the membrane turned dark grey and has no streaks. Properly and safely discard dirty cloths. Allow membrane to dry completely.
- Thoroughly mix the splice adhesive. Apply the adhesive uniformly on the lap area (both sides to be bonded) with a brush or roller as directed by the manufacturer. Some manufacturers insist that a circular motion be used to apply the adhesive while others insist on back and forth clean strokes. Make sure that you use the tool specified by the manufacturer to apply the adhesive in the correct way. A good seam depends on the quantity of adhesive applied. Typically, the adhesive is applied at the rate of approximately 10.8 m/l (135 ft/gal). Ensure that there are no skips, voids, or bare spots. The amount of adhesive required varies from manufacturer to manufacturer. Follow the manufacturer’s specifications.
- Allow the adhesive to dry (maximum 30 minutes). When it is tacky but not stringy to the touch unroll the top membrane letting it fall into place.
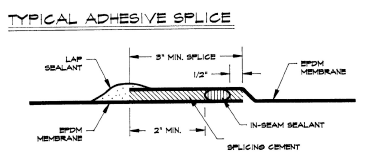
Note: Some manufacturers require a bead of sealant to be applied prior to closing the seam. The sealant is applied in a bead 9.5 mm (3/8 in) from the edge of the bottom sheet after the splice adhesive has been applied.
 After the top membrane has been unrolled apply pressure along the lap by hand. Use a 75 mm (3 in) hand roller to apply positive pressure, first across the lap towards the outside edge, then parallel to the seam.
- Allow the seam to dry (minimum of 4 hours). After allowing to dry, clean the edge of the lap with a clean cotton rag soaked in splice cleaner. Install a continuous bead 9.5 mm (3/8 in) of lap sealant along the edge of the joint. Feather the sealant directly over the lap. Make sure that all laps (including lap sealant) are completed in the same day.
Note: If it is necessary to patch a hole or wrinkle in the membrane, the patch must be at least 75 mm (3 in) larger than the hole or defect on all sides. Apply patch in similar way as a lap.
T-Joints
T-joints require extra care. Because of the thickness of the many layers at T-joints, they are usually flashed with a strip of uncured (or semi-cured) membrane. This applies to both T-joints in the membrane and overlap joints in membrane seam tape. When tape is used in the seam trim the tape so that the edge of the tape and the edge of the membrane are flush beneath the T-joint.