Laying Felts
There are two different types of felts, organic and inorganic that can be installed. However, the application methods differ between which type of felt that is installed.
Organic Felts
The installation of inorganic felt systems varies slightly as follows:
 Apply the asphalt on the deck in a uniform full mopping of bitumen, at a rate of 1.0 kg/ m² (20 lb/ square).
- Re-mop any dry spots or voids to prevent separation between the plies.
- Broom the felts into place to eliminate trapped air and enhance adhesion.
Inorganic Felts
The installation of inorganic felt systems varies slightly as follows:
 Apply the asphalt on the deck in a uniform full mopping, at a rate of 1.2 kg/m² (25 lb/square). When the surface has a full uniform wet glossy appearance, you will know that you have applied the correct amount.
- Re-mop any dry spots or voids to prevent separation between the plies.
- Do not broom inorganic felts.
Note: Be very careful not to walk on or set heavy equipment, or materials on a freshly completed fibreglass membrane before the asphalt has completely cooled. Due to the porous nature of fibreglass felts, the pressure from any heavy objects or the weight of roofers walking on it will squeeze the asphalt through the felt layers. This will result in voids in the membrane leading to leakage.
The installation of the felts must always begin at the lowest point of the roof deck. Roll out the felts at a right angle to the slope (parallel to the slope may be appropriate at higher slope rates). All felt must be laid smooth, free of all wrinkles, buckles or air pockets. Misaligned rolls must be cut off and reset.
There are several methods to apply the roofing felts (known as “laying the felts”): the shingle method or separate layer method.
Shingle Method
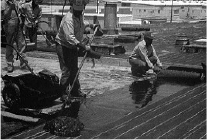
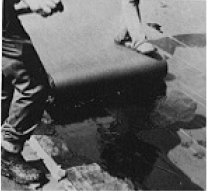
 In a typical application of felts, by mopping the asphalt, a roll of felt is unrolled onto the roof for several feet, starting at the top of the cant strip. The unrolled portion is then adjusted to give the correct amount of overlapping the previously laid felt, and to obtain the correct alignment. While the roll is kept in position, the felt end is rolled forward from the cant strip to allow for the application of bitumen, after which it is rolled back into the hot bitumen.
Hot bitumen is then spread in front of the roll of felt, usually by mopping, and the felt is rolled forward into the hot bitumen. 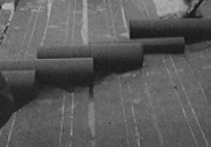 The mop is not used as a brush, but rather as a tool to deposit and control a pool of hot material in front of the roll, so that it will flood ahead of the roll in an unbroken line, filling all depressions and allowing the felt to be fully embedded to its entire width in a uniform coating of bitumen. It is important to achieve complete embedment of the felt in the bitumen with no wrinkles, voids or skipped areas.
To do this, it is necessary to roll the felts into the hot bitumen closely behind the mopping, and at no time should the mopping be more than 900 mm (3 ft) ahead of the roll.
Light pressure from a push broom or other pusher equal to the width of the felt is necessary for complete embedment of organic felts into the asphalt. Walking along the felt and scuffing it in with the feet won’t provide adequate pressure.
Most roofers start a number of rolls of roofing at one edge of the roof before continuing forward along the roof. Half-lapping gives a two-ply, two-thirds lapping a three ply, and three-quarters lapping a four-ply roofing membrane. Most felts are produced with lines marked on them to aid the roofer in obtaining the correct amount of lapping.
With the shingle method it is essential to have complete embedment of the felt plies without wrinkles or fish mouths. Otherwise, water has a direct path to the insulation below through these defects.

Separate-Layer Method
The disadvantage of direct water passages of the shingle method of laying can be overcome by applying the felts using the separate-layer method. This method entails that each layer is lapped at the edges and with layers laid so that the edges and end laps are staggered. This avoids the possibility of imperfectly sealed edges of one layer corresponding to similar defects in the other layers. This method has fewer felt laps exposed to the weather, and if there is any lifting at a lap the leakage path leads only to the next layer. This method is sometimes used in waterproofing applications but is not popular for roofing, because the laying operation is more complicated.

An alternative to the separate layer construction is the use of one and two for a three-ply roof membrane, and two and two for a four-ply membrane. It has some of the advantages of separate layers in that there are less exposed laps and no direct path to the substrate. A four- ply shingle system using 900 mm (36 in) wide felt would have a lap exposed to the weather at approximately every 235 mm (9 1/4 in), while the separate layer has an exposed lap only every 940 mm (37 in), and the two-and-two system only every 450 mm (18 in). For either of the two separate-layer type of applications, the work must be planned for continuous coverage with all layers laid in the same work period, following closely one behind the other.
 It should be noted that the practice called phased construction, i.e. laying one or two plies with the remaining plies added at a later time should not be used. There is danger of trapping construction dirt and moisture between the layers, often resulting in poor adhesion and blistering. This same situation exists when a base sheet forms the first ply of a roofing membrane. The base sheet should not be applied in a phased application, but work should be organized so that the base sheet and the additional plies can all be placed at the same time.
For any of the roofing application methods described, it is usual, where possible, to lay the felts in a direction such that draining water runs over the laps and not against them. This means starting at the lowest point or level on the roof, and placing each subsequent ply higher up the slope, so that the shingle application of felts is similar to overlapped shingles.
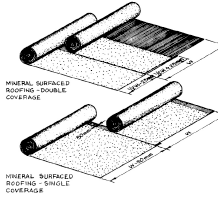 For built-up roofs, care is necessary to assure that the top coating covers all laps completely. For applications of mineral-surfaced and smooth surfaced roofing, the laps are exposed and should be laid so that water runs over rather than against the laps. On some steeply- sloped roofs, the laps are sometimes made so that water flow is down the slope and parallel to the laps.
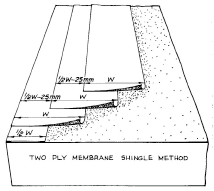
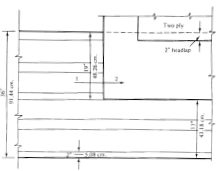
Two-Ply Membrane
To install a two-ply membrane:
- Starting at the low point, embed a half sheet of felt into a full mopping of hot asphalt.
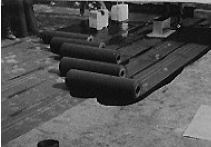
- Cover this sheet with a full width sheet embedded in a full mopping of asphalt. (Rolls of felt come from the factory with guidelines on them.)
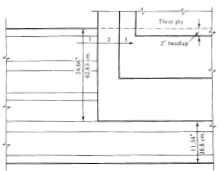
Three-Ply Membrane
The three-ply roof system can be laid in two ways; however, the best method is to cover the entire area with a single ply of felt, and then immediately cover it with an additional two plies. This method ensures that there will be less felt laps exposed and that a two- layer separator is provided for better water tightness. All three layers must be applied the same day.
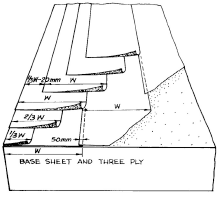
The less desirable method is to lay the felts out by lapping the previous sheet by 635 mm (25 in). To install this system:
- Start at the low point, and lay a 330 mm (13 in) wide sheet of felt into a full mopping of asphalt.
- Cover this sheet with a 635 mm (25 in) wide sheet of felt set into asphalt.
- Over this, lay a full width sheet of felt, laid in a full mopping of asphalt.
- Continue to lay out rolls by lapping the previous sheet by 635 mm (25 in) until the entire roof area is covered.
- To finish off the three-ply system, the procedure is reversed from the starting procedure. Lay a full sheet along the edge, covered with a 2/3 width sheet and then a 1/3 width sheet of felt.
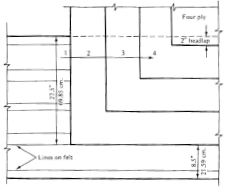
Four-Ply Membrane
The four-ply roof may also be applied in two ways. The most secure method is to cover the roof area with the two-ply method twice. Both applications must be completed the same day. The second method is to apply the felts in a step fashion, overlapping the previous sheets by 712 mm (28 in). To install the system:
- Begin by embedding a 250 mm (10 in) wide sheet of felt into a full mopping of asphalt.
- Cover this with a half width sheet 480 mm (19 in), followed by a three-quarter width sheet 712 mm (28 in) and then a full width sheet.
- Continue to roll out full width rolls, overlapping the previous sheet by 712 mm (28 in) until the entire area is covered.
- To finish off the opposite side of the roof, reverse the starting procedure. First, lay a full sheet along the wall, and cover it with a 3/4 width, ½ width and finally a 1/4 width-sheet.
At this point, the entire roof should be covered with four plies of felt and ready for the membrane flashing to be applied.
Note: Whenever organic felts are installed, they should be broomed on while being applied. Brooming will squeeze out any trapped gases between the felt layers. If they are not broomed, these trapped gases may cause blisters and wrinkles which will affect the performance of the membrane assembly. Due to the porous nature of inorganic felts, brooming is generally not required.