The third step in the procedure for installing the membrane is to apply the membrane flashing. Membrane flashings are applied to reinforce sidewalls or curbs and to seal roof penetrations. Penetrations are the most vulnerable locations on the roof and among the major causes of roofing problems. Extreme care must be taken when applying the membrane flashing. Membrane flashings (commonly referred to as stripping in the trade) are constructed by using one of the following:
- The same felt and asphalt as the main membrane (when the flashing is well nailed along the top edge).
- #15 perforated felt with Type 3 asphalt.
- #15 perforated felt with asphalt plastic cement.
- Specified compatible products (i.e. modified bitumen sheets).
The number of plies of stripping felts required for a project is usually the same as the number of plies used for the main membrane.
For example, a three-ply hot mopped membrane will require three-ply stripping. In all cases, the stripping felts must be of a two-ply minimum. The basic steps in constructing membrane flashings are installing the membrane flashing on sidewalls and installing the membrane flashing at roof penetrations.
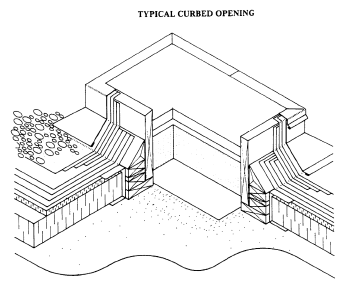
4.1.3.1 Installing Membrane Flashings on Parapet/Curbs/Sidewalls
The first step in the procedure for applying the membrane flashing is to install it on the sidewalls around all roof edges and curbs.
- Make sure that the felts extend a minimum of 200 mm (8 in) above the finished roof membrane.
- Embed the felt into full moppings of asphalt and firmly press them down by hand to provide a tight fit to the contour of the wall and cant strip.
- Apply the felts in maximum 3 m (10 ft) lengths.
- The width of the membrane flashing required is determined by the wall height.
- Extend the first ply of felt a minimum of 50 mm (2 in) out from the toe of the cant strip, up the face of the cant strip, and up the wall to the minimum height of 200 mm (8 in).
- Extend each additional layer of felt stripping an additional minimum of 50 mm (2 in) beyond the previous strip over the main membrane.
- When all the plies have been installed, fasten the top edge 300 mm (12 in) on center to prevent slippage.
- On parapets, the last two plies of felt must extend up and over the parapet and be fastened 150 mm (6 in) on center to the blocking on the face of the building.
- On outside corners, cut the felt out from the top and the toe of the cant strip and fold around the corner.
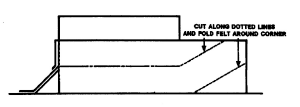
- Always be sure to start the cuts precisely at the top and toe to form a tight-fitting corner. These cuts should be made at slightly different angles for each layer to offset the openings.
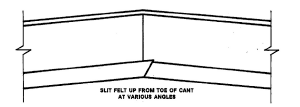
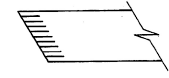
- On inside corners, cut the end of the felt strip off at a 45º angle. Along this edge, make 50 mm (2 in) long cuts, spaced 25 mm (1 in) apart along the entire edge. This will allow the felt to be pressed tight to the corner without developing folds or ridges.
- Apply the stripping felts alternately on all corners.
- Apply hot asphalt at a rate of 1 kg/m² (20 lb/square).
 When all plies of felt have been installed, glaze coat them with asphalt. Ensure complete uniform coverage.
- If installing the felt into plastic cement, apply cement to the wall area with a notched trowel, at a rate of 1.3 l/m² (3 gal/square) or as recommended ty the material manufacturer.
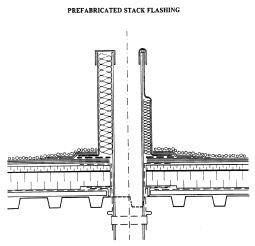
4.1.3.2 Installing Membrane Flashings at Roof Penetrations
The second step in the procedure for installing the membrane flashings is to install the membrane flashings at roof penetrations. All roof drains, pipes, chimneys and gravel stop flashings are stripped in with felts to provide a watertight seal.
Roof drains may be flashed with BUR membrane flashings or alternate materials such as modified bitumen membrane reinforcement and flashings.
The basic steps for installing the BUR membrane flashing on roof drains are:
- Prepare the roof drain for installation.
- Seal the soft metal to the main membrane.
- Open the drain.
Preparing the Roof Drain
Roof drains are assembled from four components: a bowl, soft metal flashing, a clamping ring, and a strainer.

To prepare the roof drain for installation:
- Install the four (3 for some smaller drains) studs into the bowl.
- Apply approved mastic around the top surface of the bowl in the area to receive lead flashing.
- Center the soft metal flashing over the bowl, and carefully hammer down over the four studs.
- Note: The soft metal flashing must be a minimum of 150 mm (6 in) larger than the outside bowl flange diameter.
- Over the soft metal flashing, place the clamping ring with the studs in line with the slots.
- Install washers and nuts and tighten with moderate pressure.
- Top prime the soft metal flashing flange extending out from the bowl for good adhesion.
- Coat the underside of the soft metal flashing flange with plastic cement.
- Set the roof drain in the opening; and, with a hammer and a block of wood, tap the soft metal flashing down so it is smooth and fits tightly to the contour of the roof.
Sealing the Roof Membrane to the Soft Metal Flashing
The second step in the procedure for installing membrane flashing on roof penetrations is to seal the soft metal flashing to the main membrane. The membrane flashing shall consist of a minimum of two plies of the same felt used for the main membrane. To seal the soft metal flashing to the main membrane:
- Strip in each side of the soft metal flashing individually to prevent flotation and fish mouths.
- Ensure that the first ply of stripping is wide enough to extend at least 50 mm (2 in) onto
the soft metal flashing and 75 mm (3 in) onto the main membrane. - Ensure that the second ply of stripping is wide enough to cover the first ply by a minimum of 50 mm (2 in) on every side.
- Keep the felts away from the vertical protrusion of the clamping ring by at least 12.7
mm (1/2 in) to allow the seam to be gravelled over.
Opening the Drain
The third step in the procedure for installing membrane flashing on roof penetrations is to open the drain.
- After the roof has been completed, open the drain by hammering the soft metal flashing down into the bowl.
- Fold the soft metal flashing down tight to the bowl to prevent lateral water movement.
- Install the strainer cap.
Alternatively, a cast drain may be flashed and sealed with a sand surfaced, polyester reinforced SBS Modified Bituminous membrane in lieu of a lead sheet. The minimum size of the membrane reinforcement ply shall be 762 mm x 762 mm (30 in x 30 in), centered over the drain, and fully adhered to the top of the 4-ply membrane and drain hopper flange with compatible elastomeric mastic. The SBS membrane reinforcement ply shall be trimmed to the edge of the drain bowl. The drain clamping ring shall firmly set the waterproof seal to the drain hopper flange.