Before a roof system can be installed to a new or an existing deck, the deck must be properly prepared. The following procedures are essential in preparing a deck to receive the roofing system:
- All water, ice, snow and other debris must be removed before the roofing installation can begin.
- In re-roofing, re-covering or repair, all damaged or deteriorated roofing materials must be removed.
- Adequate protective measures must be taken to protect the buildings, surroundings and personnel. In addition, materials that are to be stored on the site must be protected from the weather.
- Check the surface condition of deck. Each type of deck has its own unique preparation requirements including installation of curbs and drainage.
On new construction, it is the responsibility of the general contractor to ensure:
- The steel deck is rigid, completely anchored and free from oil, grease, scale, or other foreign matter before expecting roofing to commence.
- All debris, snow, etc. are cleaned off deck prior to calling upon roofing contractors to accept the surface of the deck.
- All nailing strips, equipment curbs, penetrations, etc. are in place and secured prior to calling upon roofing contractors to commence roofing.
3.1.2.1 Water, Ice, Snow and Debris Removal
Ponding Water
Roof systems should be designed to drain or shed water. Water as the result of rain or melting snow, is normally drained off the roof through interior drains or external scuppers. When water is allowed to pond, or accumulate on a roof, it can have serious consequences to or the roof’s performance and lead to many problems.
Some of these problems include:
- A minor defect during construction or a small opening in the roofing membrane could allow the ponding water into the roof system. This moisture may be absorbed by the materials under the membrane causing deterioration, rot, loss of compressive strength, swelling and even corrosion of metal components. It will also result in the loss of the insulating (R-value) properties of most insulation which leads to higher energy costs.
- Should a leak occur in an area of ponded water, effective repairs become very difficult if not impossible. Also, damage from leaks to the building interior and contents may be catastrophic.
- The combination of ultraviolet light and water can have a more damaging effect on most roofing materials than either one alone.
- Moisture on a roof can encourage the growth of moss or vegetation which may cause damage to the membrane.
- Approximately each 25 mm (1 in) of ponded water adds 25 kg/m2 (5 lb/ft²) to the live load on the roof structure. The deeper the water gets, the greater the deflection, which allows more water and so on. This can lead to permanent deflection of the deck and even collapse.
- The most vulnerable areas of any roof are the flashings and roof projections. If these are located in areas of standing water they may become sources of roof leaks.
Water should not be allowed to pond on a roof area. The rule of thumb is that no area of water ponding should occur 48 hours after a rainfall. Under normal weather conditions most water will have evaporated from the roof within that time.
Ponding should not be confused with “bird baths”. Bird baths are small areas of the roof (less than 1 m2 (10 ft²)) where water may collect due to the unevenness of the roof surface.
 Sometimes, even though the roof is adequately sloped, you may encounter ponding due to blocked drains or scuppers. Periodical inspection of drains and scuppers to ensure they are clear of debris such as leaves, snow or ice and other accumulated objects that may which impede their free flow. Be extra careful on reroofing projects to make sure no roofing materials fall into the hoppers and rainwater leaders.
Before roofing operations begin, any surface water can be removed by pumping, vacuuming with a wet-vac, or, in some cases, by simply directing the water to the existing drains using brooms and shovels.
The final drying of the roof may take place naturally or with the help of air pack blowers and tiger torches. Caution should be taken when using the open flame torch so as not to damage the deck or ignite any roofing materials.
Snow and Ice
In colder climates, where temperatures fall below freezing, ponding water turns to ice. When the ice is covered with an insulating cover of snow, the heat loss from the building through the insulated roof system may be enough to melt the snow and ice next to the roof membrane. The end result is a layer of water, a layer or ice floating on water and a blanket of snow. Under these types of conditions, the roof membrane would have to be in perfect condition to prevent moisture infiltration. In addition, ice and snow make any roof deck slick and slippery creating potential work hazards.
During the installation of roofing in inclement weather months, the removal of snow and ice become just one more step in the application of a roof system.
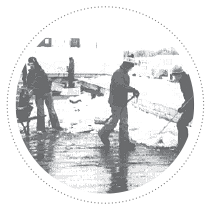 The following procedures should be followed in the removal of snow and ice.
- On concrete decks, the immediate priming and possibly light flood coating of dry slabs and decks allows for easier removal of snow and ice and easier drying of the surface after a snow or rain.
- Drain hoppers on most concrete decks are raised and arrangements should be made to have additional small holes made around the hopper to help relieve ponding water before it turns to ice. This type of problem may require pumping.
- Laying of tarps or polyethylene the night before will help protect roof decks from early morning frost and gravel piles from snow and ice build-up.
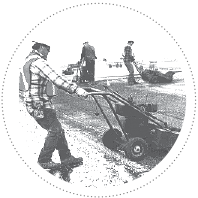
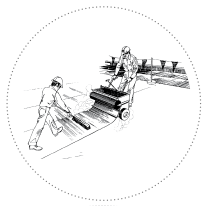
- Snow blowing and power sweeping equipment help remove large quantities of snow and frost. Shovels and brooms can be used to remove small amounts of snow, ice and frost.
- Propane torches can be used to both melt snow and ice and dry roof decks (use with extreme caution).
- Schedule the work so that the ice and snow in the section to be roofed is completely removed before the actual roofing work begins.
- Use pumps and vacuums to remove melting snow, ice and frost from the deck.
Debris
Different types of debris can be found on a roof area such as leaves, twigs, old roofing materials and construction debris. All debris should be removed from the roof before attempting to install a roof system as leaving it on the roof can have serious consequences on the roof’s performance, including: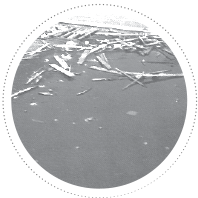
- Poor adhesion between the plies, or roofing layers caused by dust and particles blown from debris.
- Deck deflection caused by large piles of debris such as an old roof membrane piled on the roof.
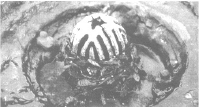
- Blockage of drains and scuppers from debris (leaves, rubbish, old roofing materials).
In addition, debris can make a roof surface an unsafe place to work.
Typically roof debris can be removed by hand using scoop shovels, brooms and wheelbarrows. A power sweeper may be used on large roofs areas to sweep debris into piles that can be shovelled up and removed. Chutes can be used on many larger jobs to direct debris from the roof into trucks or bins on the ground.
Never throw roofing debris from roof level onto the ground.
Air pack blowers can be used to blow dust, leaves and small debris from roof decks into piles for pick up and removal.
Some jobs require the debris to be packaged up using drums, plastic bags or boxes and removed through the interior of the building or placed in roof mounted bins and hoisted by crane from the roof. Take all necessary precautions when removing debris so as not to damage or stain any interior finishes.
3.1.2.2 Roofing Material Removal
 In order to expose an existing roof deck for inspection, repair, or replacement the existing roofing materials will need to be removed. When reroofing or repairing an existing roof, it is necessary to remove the existing damaged and deteriorated roofing components. Repairs can consist of simply cutting and patching a blister to the removal of several squares of roofing. In most cases, the existing roof membrane and sometimes the insulation has to be removed to perform proper repairs.
In order to carry out roofing repairs properly it will be necessary to:
- Identify area(s) and the nature of repairs.
- Remove excess gravel, dust and debris using brooms and shovels from repair areas.
- For BUR roof systems, use spud bars or a mechanical roof spudder to remove the flood coat and gravel from the repair area where the tie-ins will occur. Remove at least 300 mm (12 in) beyond the repair area to allow for proper “tie-in” with existing membrane.
- In single ply, or modified bitumen roofs, prepare the area of the tie-in in strict accordance with the membrane manufacturer’s instructions.
- Remove damaged or deteriorated roof membrane by cutting on the inside of the “tie- in” through the existing plies of the membrane and lifting out the damaged membrane using a spade.
- If the repair requires the removal of the existing insulation, cut through the insulation down to the deck and remove using a spade or shovel and discard.
- Clean debris and dust from repair and surrounding area. Special attention should be made to ensure that the tie-in is clear of debris and dust free.
As an existing roofing system becomes older, it may no longer be practical or economical to continue to repair it. When the time comes to install a new roof system, the existing roof has to be removed. When reroofing, the procedures outlined below should be followed for each particular roofing system type:
 Remove excess gravel and dust using a power sweeper. This process removes excess weight during the tear-off and allows for an easier clean up.
- If a larger area of the roof is to be removed and can be completely reroofed in one day, a tie-in may be required.
- Spud a tie-in using a spud bar or mechanically using a spudding machine, along the entire length and width (if necessary) of the reroofing area.
- All temporary seals (night seals and water cut-offs) must be removed the following day as the reroofing progresses.
Roof membranes can then be cut into small manageable pieces using an adjustable roof cutter or axes and spades can be used to pry the membrane from the insulation below. Existing insulation can be removed with spades by prying the insulation from the deck. If possible, remove the existing vapour retarder. Sometimes this may require the grinding of the deck, the use of steel brushes, or other mechanical means.
Debris from tear-off should be removed from the roof area whenever possible. Sweep deck and tie-in of all dust and debris. Once these steps have been followed, the reroofing procedure can begin.
Remember, when a new or re-roofing installation begins, potential hazards develop during construction which may require the application and installation of different types of protective measures around the perimeter and to the deck and its openings.
- Check the deck before loading material, equipment and men, ensuring that the deck hasn’t deteriorated and is able to support the load. On new work, inspect the deck panels to verify they are securely fastened to the joists, not just laid in place. Irregularities should be reported to the general contractor.
- Inspect all deck openings to verify they are reinforced under the deck. Openings must be covered or provided with a guardrail. Covers must be strong enough to bear the weight of persons and equipment and secured in some way to prevent them from being accidentally bumped off the opening by foot or equipment traffic.
 Review the roof area for possible locations of electrical conduit. Electrical conduits could be installed directly below the deck or directly above deck buried in the insulation. Damage to conduit could result in electrical shock to workers.
- Never remove protective covers without direction from supervisor and always recover openings immediately when roofing or flashing has been completed.
Be especially careful when removing protective covers – many roofers have removed a cover and then walked into the opening.
- On steel decks, check for weak, rusting decking especially around gas or infrared heating units and overhead doors. Condensation created by heating units can rust steel decks.
- Do not roof over welding rods left lying in the corrugations on a steel deck. Flux and humidity action can cause welding rods to eat through the deck.
- Where site conditions require rooftop storage, never store tools, equipment, or material within 2 m (6.5 ft) of the roof perimeter.
- When pumping hot tar or asphalt through a pipe while the pipe is discharging within 2 m (6.5 ft) of the roof edge, a guardrail must be installed at the roof edge.
 When operation of equipment requires walking backward, the following three warning systems should be used:
- A warning barrier 1.1 m (43 in) high placed at least 2 m (6.5 ft) from the roof perimeter.
- Visual markers on the roof.
- A fellow worker to warn the operator when they approach the roof perimeter.
3.1.2.3 Roof Deck Condition
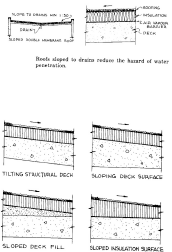
All roof decks should be designed with a slope to drain a minimum of 1:50 (2%). An ideal roof deck would have the following characteristics:
- Provide a clean, dry even surface for nailing, mopping, or cold process applications.
- Does not release moisture into the roofing system.
- Have good strength to allow for removing and replacing of roof systems.
- Be able to resist dimensional changes during curing or drying and through seasonal cycles.
- Not be permanently damaged by moisture condensation or a leaking roof system.
- Be fire resistant.
- Be able to absorb and dispel small amounts of moisture.
- Have a dry, dust free surface able to resist wind uplifts.
- Be resistant to rot and decay.
- Be able to support loads, winds and sudden impacts.
- Have sufficient strength so that deflection does not exceed 1/270 of the span when subjected to a load equivalent to 17 kPa (355 lb/ft²).
- Resistant to damage from handling, transit, installation and foot traffic.
All deck openings with the exception of drains should be curbed. The top of curbs should be a minimum of 200 mm (8 in) above the roof surface membrane. Included in this curbing should be cant strips for BUR, stripping felts, with the top ply fastened on top of the curb, and metal flashing carried over and fastened on top of the curb.
No exposed plates, bolts, conduits or fittings should be above the top surface of the roof deck. Where projections exist, an auxiliary substrate should be installed to provide a continuous surface to apply the membrane on to.
The roof deck should always be inspected by the contractor or by the foreman of the roofing crew before any roofing is started to ensure that all deck construction has been completed. Once the inspection is complete and any unfinished or improperly installed construction details found in the deck are repaired or satisfactorily complete, the roof application can begin.
The successful installation of a roofing system begins with a structurally sound deck. It is the responsibility of both the roofing contractor and the structural engineer to confirm that the deck is suitable for roofing before the installation begins. As a general rule, the roofing contractor has accepted the condition of the deck once the installation has begun. From this point on, the roofing contractor can be held responsible for damage or snow removal.