Small engines are used for all types of different jobs on a roof to help save time and to make otherwise monotonous physical tasks easier to complete for the roofer. Small engines can be used to power hoists, sweepers, roof cutters, kettle pumps, spudding machines and various other pieces of equipment, and vary in size from about one to twelve horsepower.
Several types of small engines are manufactured for service in the roofing industry, but care must be taken in order to provide trouble-free operations. Regardless of their type, all engines must receive proper care and attention.
Several safety factors should always be applied when operating small engines. These include:
 Ensure all safety guards are in place.
- Do not fill the gas tank while engine is running. Allow the engine to cool for at least two minutes before refuelling.
- Do not operate engine without a muffler. Inspect muffler periodically and replace when necessary.
- Periodically clean muffler area to prevent combustible materials from accumulating.
- Do not choke carburetor to stop engine.
- Do not touch hot muffler cylinders or fins as contact could cause burns.
- To prevent hand and arm injury, always pull starter cord rapidly to avoid kickback.
- Never start engine without a blade or with loose blades as this could cause severe kickback.
- Always keep hands and feet clear of moving or rotating parts.
- Do not strike flywheel with a hand object or metal tool when working on equipment as this could cause the flywheel to shatter during operation.
- Always consult the engines operation and maintenance manual for a complete list of safety concerns.
Starting Small Engines
Before starting any small engine, the oil and fuel level should be checked and added to if necessary.
- If the engine does not start open the choke halfway and try to start the engine again.
- Once the engine starts open the choke fully and allow the engine to warm up for a few minutes.
- Do not operate engine in a partial choke position. This could result in excessive high speeds that could damage the engine.
To turn the small engine off use the ground switch. When the switch is moved to the “off” position, it causes the ignition to short out, stopping the engine. The choke should never be used to stop the engine as it causes the engine carburettor to flood and makes restarting difficult.
Basic Maintenance
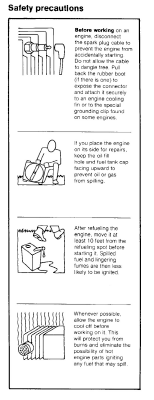
Before servicing any small engine, the spark plug should be removed or the spark plug wire disconnected and placed in the holding tab to prevent accidental starting.
Oil
As noted earlier, engine oil should be checked before the engine is started. This is a good habit to get into as small engines may hold as little as 0.9 litres (1 quart) of oil or less and this supply can be used up quickly. Should the oil level become too low the engine could “seize.” The oil level should be checked about every five hours of operation. Oil should be changed after 25-40 hours of operation. This could work out to once a week for engines that work all day (like hoist and kettles). Change the oil after every 20 hours of operation when the engine is under heavy loads or in excessively high temperatures.
The following steps should be followed for changing engine oil:
- Remove the oil drain plug.
- Drain the oil into a suitable container while the engine is warm and reinstall the drain plug.
- Remove the oil filler plug and refill using new oil of proper grade. Reinstall oil filler plug.
- Start engine and allow to run for one minute. Stop and allow cooling a few minutes, checking oil level and adding more oil if necessary.
Gear Reduction Oil
Oil should be changed after every 100 hours of operation or as specified in the equipment operating manual. Only use oil type and grade specified in the equipment operating manual.
Air Filter
Just as on your car the air filter prevents dust and dirt from entering the engine. Three types of basic air filters are used on small engines:
- Oil foam filter
- Dry element filter
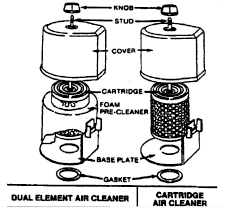
- Dual-element filter
Air filters should be cleaned every three months or every 25 hours of service, whichever comes first.
On dirty, dusty job sites, the air filters should be checked more often and cleaned or replaced as required.
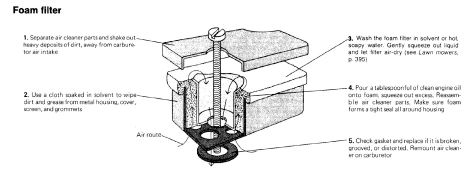
Oil Foam Filter
- Remove screw and remove air cleaner. Be careful to prevent dirt from falling into carburettor.
- Take air filter apart and clean.
- Wash the foam filter in kerosene or liquid detergent and water to remove dirt.
- Wrap foam in a clean cloth and squeeze dry.
- Saturate foam with engine oil (squeeze to reinstall on engine).
Dual Element Filter
- Remove the knob and cover.
- Remove foam-element by sliding it off the paper cartridge.
- Wash foam pre-cleaner in kerosene or detergent and water.
- Wrap pre-cleaner in clean cloth and squeeze dry.
- Apply engine oil to foam (squeeze out excess oil).
- Clean paper cartridge by tapping on a clean flat surface or replace with a new one.
- Install the foam element over the paper cartridge, reassemble and screw down tight.
Dry Element Filter
- Remove nut and cover and remove filter from engine.
- Clean by tapping the filter on a flat surface or if very dirty, wash with water and a non- sudsing detergent. Rinse thoroughly with flowing water from inside out until water runs clear.
- Do not use kerosene to clean cartridge.
Spark Plugs
Spark plugs should be checked periodically for excessive wear.
Spark plugs should be cleaned and reset to gap 7.5 mm (5/16 in) (or as specified in the equipment operating manual) after every 100 hours of operation.
Spark plugs should be cleaned by scraping or wire brushing and washing with a commercial solvent.

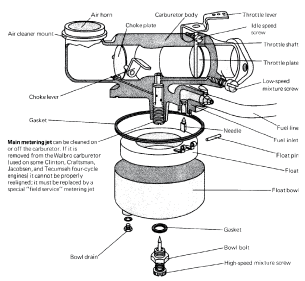
Carburetor Adjustments
On some engines minor carburetor adjustments may be required during the course of the job to compensate for differences in fuel, temperature, altitude or load.
 Turn idle valve clockwise until closed then turn the idle valve counter clockwise one-half to three quarters of a turn.
- Turn the needle valve gently clockwise until it just closes. Too much turning could damage the valve.
- Open the needle valve 1/2 turn counter clockwise. This will allow the engine to be started and warmed up before final adjustments.
Final Adjustments
Restart the engine and turn the needle valve clockwise until the engine misses (lean fuel mixtures).
Turn the needle valve counter clockwise past the point where the engine runs smoothly to a point where the engine runs unevenly (rich fuel mixture).
Turn the needle valve midway between the rich and lean adjustments so the engine runs smooth.
If engine does not accelerate properly, the carburettor should be readjusted, usually to a slightly richer mixture.
Whenever possible, the manufacturer’s operating instructions should be read and understood before operating or adjusting any type of equipment.