Steep slope roofing refers to roofs that are designed with a slope of 1:4 or steeper. The roofing materials used in steep slope roofing are designed and installed to provide a water shedding surface and not a waterproof membrane.
Materials used in steep slope roofing are manufactured in smaller sizes, compared to low slope roofing materials and are designed to overlap the preceding courses in such a way as to provide a water shedding surface for moisture to run downwards towards the eave preventing water from entering the roof.
Roofing materials that are typically used in steep slope roofing system include:
- Roof covering
- Shingles: asphalt, wood shingles and cedar shakes
- Tiles: metal, concrete, fibre-cement, clay, slate
- Sheet metal
- Eave protection
- Underlayment
- Flashing
Some low slope materials (i.e. PVC, TPO, modified bitumen membranes) are used as roof coverings on steep slope roofs.
The basic steps for installing any steep slope materials are:
- Estimate materials
- Prepare the deck
- Install eave protection, underlayment, metal flashing
- Install roof covering
There are some modifications to these steps, depending on the type of roof covering, but the basics remain the same.
Proper tools and equipment are essential in installing any roofing material. The hatchet that is typically used is a lightweight hatchet with a non-skid head. This type of head prevents the hatchet from slipping off of rough galvanized nails. The blade is used for cutting and splitting the shingles. Make sure to keep it sharp.
The tools that are required include a tape measure, chalk line, utility knife and tin snips. For cutting the valley and hip materials you will need a circular power saw. Wood shingles can be cut with a hatchet or a straight blade utility knife.
Estimating Materials
The first step in installing any roofing material is to estimate the amount of specified materials that will be required. The dimensions and quantities required are:
Dimensions
- Area of the roof
- Length and width of eave for starter course and eave protection
- Length of hips and ridges for capping
- Length of all valleys
- Length of perimeter for flashing
- Length of all side walls and roof projections for flashing
- Any required attic vents
Quantities
- Number of bundles of materials
- Number of lengths of flashing
- Amount of eave protection and underlayment material
- Number of nails, adhesives, vents
The coverage for materials will vary depending on the exposure that is specified. Always estimate material quantities based on the specified exposure.
Number of Bundles
After determining the required area and lengths you can estimate the total material needed. The total amount of material that is required will depend on material coverage and exposure.
A waste allowance of between 5 and 10 percent should be calculated when you are determining the total material requirements.
Number of Lengths of Flashing
Flashing for perimeter and horizontal sidewall projections can be calculated. Step flashing used on vertical sidewalls and chimneys will vary depending on the exposure of the material. Step flashing generally has a 75 mm (3 in) head lap. As an example, if you are using a 250 mm (10 in) exposure, you will require a length of flashing a minimum 300 mm (12 in) long for every 250 mm (10 in) length of wall. Metal valley flashing must be lapped a minimum 150 mm (6 in), so take this into account when determining the total valley lengths.
Eave Protection
Material chosen for eave protection will vary depending on material and the method of installation. Check the labels of the material specified and apply this to your determined area.
Underlayment
The use of an underlayment material is recommended with the roof covering. The material for underlayment may be one of the following:
- Asphalt felt
- Synthetic sheet
- Polymer-modified bitumen sheet
- Self-adhering polymer-modified bitumen sheet
Underlayment used under wooden shingle roofs must be vapour permeable.
Nails, Vents and Adhesives
Quantities of nails and vents can be estimated. Ensure nails are of sufficient length to penetrate a minimum 19 mm (3/4 in) into the roof sheathing at all times, including capping.
Preparation
Ventilation
The ventilation requirements of the building and roof spaces should be reviewed prior to installing any roofing material. Ventilation is required in order to maintain similar temperatures on each face of the roof coverings to minimize condensation and optimize the performance of the asphalt shingle. Attic ventilation needs to be equally distributed between the soffit/ eave and ridge. This is commonly achieved at the eave with installation of soffit venting and use of baffles to ensure that the attic insulation does not obstruct the soffit vents.
Roof Deck
The entire roof deck should be inspected for weak spots in the deck, unnailed, and/ or damaged areas of sheathing. Notify the general contractor or foreman of anything unusual so that it is repaired prior to the roof system being installed. Once the deck is adequately repaired, the deck is to be cleaned of any dirt or debris prior to installation of eave protection and underlayment.
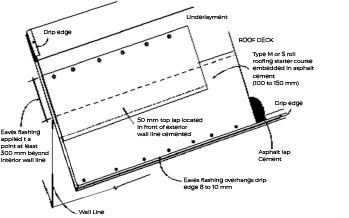
Eave Protection
Roofs over heated spaces require the installation of eave protection or “ice and water shield” membrane. The eave protection membrane should be installed starting along the edge of the roof and extend up the slope a minimum of 900 mm (36 in) to a line not less than 300 mm (12 in) inside the inner face of the exterior wall of the building, as measured on a level plane. The membrane is installed beneath the starter strip and extends up any adjoining walls to the top of flashing.
Eave protection membranes are generally a single-layer application of self-adhering polymer-modified bitumen sheets. These types of self-adhering sheets must comply with CSA A123.22 Self-adhering polymer modified bituminous sheet materials used as steep roofing underlayment for ice dam protection which should be designated on the manufacturer data sheets.
Underlayment
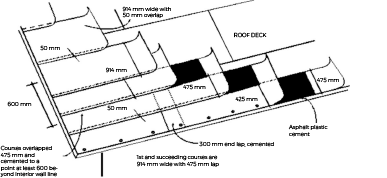
The underlayment is installed parallel to the eave and overlapped as recommended by the manufacturer. Typically, side and end laps are 100 mm (4 in). The underlayment should overlap the eave protection material by not less than 100 mm (4 in). Only use sufficient nails, as required, to hold the underlayment smooth and to hold in place until the covering is installed.