Installing a tile roof involves installing the eave protection, the felt underlay, the strapping and counter strapping, the flashing and the tiles. It is crucial that the strapping and flashing is properly installed because these serve as the guides for installing the tiles.
The basic steps in installing concrete tile roofs are the same as those for installing any steep slope material are:
- Estimating materials.
- Preparing the deck.
- Installing the eave protection and underlayment.
- Laying out the roof.
- Installing the tiles.
9.3.3.1 Estimating Materials
In order to estimate the amount of material required to install concrete tiles, you will have to determine the same dimensions you determined in installing each of the other types of steep roof coverings. Once you have determined these dimensions, you can use the figures to calculate:
- The number of tiles needed to complete the main area; Concrete tiles are packaged in pallets containing 2 squares per pallet. 1 square equals 9.3 m2 (100 ft2). So, dividing the total area of roof by 18.6 m2 (200 ft2) will give you the number of pallets required.
- The number of rake cap tiles. This will vary according to the desired exposure. Dividing the lineal footage of the rake by the length of exposure will give you the number of tiles needed to cap the rake.
- The number of ridge and hip cap tiles. Once again, this will vary according to the desired exposure. Dividing the total lineage footing of the ridge and hip by the length of the desired exposure will give you the number of tiles needed to cap the ridge and hip.
- The number of manufactured vents. You’ll require 0.09 m² (1 ft2) of ventilation for every 13.9 m² (150 ft2) of floor area.
- The length of the eave closure.
- The length of the cap closures.
- The length of the wall flashings.
- The length of the valley flashings.
- The length of the channel flashings.
- The length of the drip edge flashing.
- The amount of wood strapping. Horizontally, strap per desired exposure length. Vertically, strap for every rafter.
- Number of rolls of felt for eave protection and underlayment. There should be one roll of felt per 37 m2 (400 ft²) of area.
You should order extra tiles in case tiles are damaged or otherwise unusable.
You will need putty for the installation of ridge and hip caps and for the installation of valleys. The following amounts of putty will be required:
Ridge Cap 6 m /bag (20 ft/bag)
Hip Cap 4.9 m/bag (16 ft/bag)
Valleys 10 m/bag (32 ft/bag)
9.3.3.2 Preparing the Deck
As is the case with any steep roof, the roof deck should be inspected before you load any of the concrete tiles onto it. Have any deficiencies in the roof deck repaired before you start your work. The roof deck sheathing should be cut flush with the facia at both the eave and gable ends. Ensure that the substructure is capable of supporting the weight of the tiles. When you are re-roofing a building where the existing roof system weight is less than the proposed tile roof system weight, it is recommended that you consult a professional structural engineer. All roof penetrations should be in place before installation of the tiles begins.
Install the underlayment and complete the strapping before loading the tiles onto the
deck. Once these are complete, use a crane or a cherry picker to load the tiles onto the
deck. It is important to distribute the material in such a way that overloading of any one
area is avoided. To accomplish this, it is best to mark the roof, dividing it into sections, and
then to distribute the materials systematically amongst the sections.
Remember it is easier to carry the tile up the slope than it is to carry it down. Overloading the roof with tiles will result in a lot of extra moving.
9.3.3.3 Installing the Eave Protection and Underlayment
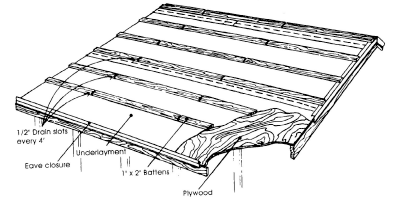
Before installing the eave protection and underlayment, the roofer must first install a 38 mm x 38 mm (1 1/2 in x 1 1/2 in) wood nailer along the gable ends (rake). Fasten the nailer flush with the fascia and nail it with 38 mm (1 1/2 in) hot galvanized, common nails, 250 mm (10 in) on center. Start the rake nailer 50 mm (2 in) up from the eave fascia.
For valley lining and eave protection, a self-adhering modified bitumen sheets to be installed. For field underlayment, a minimum one layer of polymer-modified bitumen sheet should be installed. The use of these materials is recommended for long term durability, since the expected service life of an asphalt saturated felt sheet falls is below of the expected service life of clay and concrete roof tile.
On all valleys, center a layer of a self-adhering sheet the length of the valley overhanging eave by 19 mm (3/4 in).
Upon completion of the above steps, install the eave protection. Install a layer specified eave protection. The eave protection should extend up the slope a minimum of 1220 mm (48 in) and overhang the eave by 19 mm (3/4 in) unless drip edge metal is used. If metal is used, install it flush with the edge. On the remaining roof deck, install a single layer of underlayment. Lap all head laps 100 mm (4 in) and end laps 150 mm (6 in). Tack the laps sufficiently to hold them in place until the strapping is installed. All felts should extend up the wood nailer on gable ends. The underlayment should extend a minimum 150 mm (6 in) up all sidewalls, chimneys, etc. Seal corners with caulking.
All areas of the materials that are damaged or torn must be repaired or replaced prior to installing the strapping.
9.3.3.4 Laying Out the Roof
The layout of roof decks receiving concrete tiles involves the installation of wood straps over the underlayment.
It is important that all strapping is accurately placed. The first series of straps are referred to as vertical counter straps, 38 mm x 9.5 mm (1 1/2 in x 3/8 in) wood or plywood. Install 2 counter straps parallel to all valley centerlines.
Install both straps 160 mm (6 1/4 in) from the centerline. Install an additional strap 25 mm x 50 mm (1 in x 2 in) on top of these two. On all vertical sidewalls and gable ends, install a strap the length of the slope, 25 mm (1 in) from wall or rake nailer. If a channel flashing is to be used, install a counter strap 160 mm (6 1/4 in) from the wall.
Hips must have counter straps applied along both sides, 32 mm (1 1/4 in) from the centerline. Counter strap all chimneys by leaving 25 mm (1 in) spacing on the sides. On the top back, install straps in two lengths with a taper of 25 mm (1 in) space on the corners and 50 mm (2 in) space at the center. Caulking must be applied around these straps. On the remaining surface locate the roof joists. Install the straps along the rafter up the slope and fasten them with 50 mm (2 in) hot, galvanized, common nails 600 mm (24 in) on center.
The second set of strapping is referred to as horizontal main strapping. These straps should be 25 mm x 100 mm (1 in x 4 in) dry spruce #2 grade or better. Nails should be a minimum 64 mm (2 1/2 in) hot, galvanized, common or of sufficient length to penetrate the roof truss a minimum of 25 mm (1 in). Before installing these straps, all flashings should be installed. Along ridges and hips, install a 50 mm x 50 mm (2 in x 2 in) on the centerline. Fasten it with two 100 mm (4 in) nails, cross nailed into the truss, 600 mm (24 in) on center.
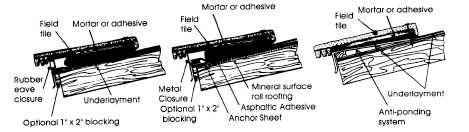
Along the eave install a 50 mm x 50 mm (2 in x 2 in) wood nailer, 50 mm (2 in) in from deck edge. Fasten it with 90 mm (3 5/8 in) galvanized nails in each truss. Install flashing along eave. Sheet-metal valley flashing should be installed overhanging eave by 22 mm (7/8 in). The sheets should be lapped 100 mm (4 in) and caulked between them. Fasten the flashing with 25 mm (1 in) galvanized roofing nails, 600 mm (24 in) o.c., ensuring that the flashing is applied straight to the center line. At the peak of the valley, mold a 200 mm (8 in) square piece of lead capping over the joint with the laps caulked. Channel flashing should be installed along sidewalls. It should start on the low edge and run up the slope, lapping the joints 100 mm (4 in). It should be sealed with caulking. Install the first main strapping, 350 mm (14 in) from 50 mm x 50 mm (2 in x 2 in) eave blocking.
The next strap is installed 25 mm (1 in) apart from the ridge board. Ensure these two are parallel distances apart from each other. Measure the distance from the top of the first strap at the eave to the top of the strap beside the ridge. Divide this length into equal spaces not exceeding 345 mm (13 3/4 in).
After determining the number of equal spaces, mark them along the gables ends and apply horizontal chalk lines. Apply the horizontal main straps with the top edge along chalk lines. Fasten them with 2 nails in each truss and one in between. Ensure the felt underlay has not been damaged before the installation of the tiles begins.
9.3.3.5 Installing the Tiles
The installation of concrete tiles involves basic steps, which when complete will provide an adequate water shed.
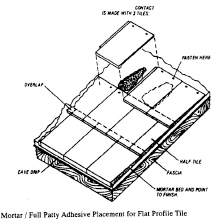
Tile Placement
Install the first two rows of tile beginning in the lower right-hand corner working up to the ridge along your vertical guideline.
Fasten each tile with one 38 mm (1 1/2 in) large head, galvanized, roofing nail. The fastener length will depend on tile thickness and profile. Tile fasteners should be long enough to penetrate 19 mm (3/4 in) into the deck or completely though deck sheathing that is less than 19 mm (3/4 in) thick. Upon completion of these two rows, install the rake cap along the gable. Fasten each cap with two 90 mm (3 5/8 in) galvanized common nails or nails of sufficient length to penetrate the deck by 25 mm (1 in).
When using the slate profile, the rake cap must be sealed to the tile with putty or exterior caulking. Next, install two rows of tile along the eave, fastening each with one nail. Adjust to the vertical guidelines every fifth tile. When using a solid eave closure on estate tile profile, install at this point allowing enough to fill in rake caps. After completion of the two eave courses, install two rows of tile up along the left-hand gable in a similar fashion. If the tile has to be cut on the lower part of rib (estate and bar), a rake channel must be installed before the rake cap. The final step is to fill in the remaining area. On slopes of 5 in 12 or less, fasten every tile every fourth row in the predrilled holes. On slopes between 5 in 12 and 12 in 12 fasten every tile every other row.
Note that the fastener type and density will be determined in accordance with the design wind uplift loading.
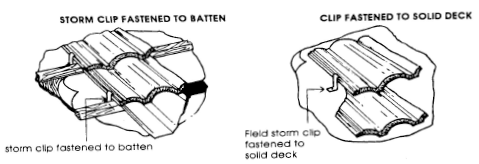
On slopes over 12 to 12, fasten every tile. On buildings where the height exceeds 12.2 m (40 ft), and/or the wind speed exceeds 130 km/h (80 mph), consult manufacturer for recommended fastening techniques. In these instances, a metal “storm clip” is normally used to secure the individual tile to the underlying batten or deck. The opposite side of the roof is applied in a similar manner. After completion of the two rows of tile along the eave and gables, install two rows along the ridge and install the ridge cap before filling in the main roof area. If tiles are cut for hips and ridges, it may be necessary to drill new holes for fastening. Tiles should be cut within 25 mm (1 in) of the ridge or hip.
All capping should be applied as work progresses. Ridge length should be measured and divided into equal exposures, maintaining a minimum 75 mm (3 in) lap. Fasten every cap with one galvanized nail 50 mm (2 in) into the ridge strap. Joints between caps must be sealed with putty or exterior caulking. Caps should be “set in” putty or mortar. Cap closures on the ridge ends must be glued to both the tile and caps.
Valleys
Valleys should always be tiled in before the main roof, to minimize dust and traffic in this area. Tile should be cut from a minimum 50 mm (2 in) to a maximum 75 mm (3 in) of the centerline of flashing. Ensure cuts are straight, parallel and an equal distance on both sides of the centerline. Place a 50 mm (2 in) square layer of putty along the valley flashing before installing the cut tile.
Chimneys & Walls
Chimneys on concrete tile roofs are flashed much like chimneys on shingle roofs are. On concrete tile roofs, however, lead flashing material is used.
Tiles should be cut to fit as close as possible to the chimney. New holes may have to be drilled in order to fasten the tiles. On the base flashing, the lead should extend 150 mm (6 in) up the chimney and 100 mm (4 in) over the tile.
On the sidewalls, the lead should extend up the chimney 150 mm (6 in) and lap over the tile to the next low point on the rib or profile.
Fold corners a minimum 25 mm (1 in) around projection. Mold lead to fit snugly to the chimney and tile. Behind the chimney, a saddle or cricket must be built. It should be a minimum of 100 mm (4 in) wide and extend up the chimney to a point equal to the height of the tops of tile on sides. Cover the saddle with lead flashing that extends up the chimney 150 mm (6 in) and up the slope to cover the next strap. Tiles should be set in a 50 mm (2 in) square layer of putty on top of this lead.
Vents
Install a piece of lead large enough to reach the low rib on both sides and long enough to slip under the next course of tiles. Punch a hole in the center and fold the lead inside the pipe. Install factory made attic vents as close to the hole in the deck as possible. Various vents are manufactured by the tile supplier to match the profile of the tile you are applying to provide an adequate seal.
Flashings
Lead flashings are used to seal both horizontal and vertical sidewall projections. On vertical sidewalls, the lead must extend up the wall 100 mm (4 in) and be wide enough to lap over the tile to the next low rib or profile. Horizontal flashing should lap tile and extend up the wall 100 mm (4 in). If metal is used, a closure strip or putty must be applied first to fill in ribs.