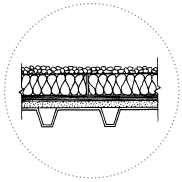
 The protected membrane roofing system (PMR) differs from conventional BUR systems in that the membrane is installed below the insulation, either directly to the deck, or in the case of steel decks onto a levelling layer secured to the deck. The most common levelling layer is gypsum board, however, plywood, cement board or any insulation that can span the flutes of the steel deck can be used.
The roofing membrane is then installed as it would be in a conventional system. However, because the membrane is below the insulation, a separate vapour retarder is not necessary.
Once the membrane is completed, it must be protected with a sufficiently thick coat of asphalt. This is achieved by applying two applications of asphalt. The second application is applied after the first has been allowed to cool. To prevent the insulation from sticking to the top of the membrane, a separation sheet, such as polyethylene sheeting is sometimes installed.
After the membrane has cooled the insulation can be applied. It is laid dry with joints in moderate contact and end laps staggered.
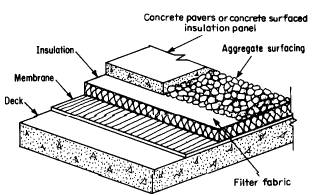
 In a protected membrane roof, the mineral aggregate functions as ballast that keeps the insulation in place. It is applied dry on to the surface of the insulation, or on top of a filter fabric that is installed on top of the insulation first. The filter fabric, often referred to as fabrene is a geotextile fabric, used primarily in the lightweight PMR design. It acts as a diaphragm that prevents the insulation that is unbonded to the roof from being displaced from flotation. It allows less quantities of ballast to be used. In addition, it also prevents fines and dust from getting between the joints of insulation.
The protected membrane assembly is widely used throughout Canada. Because the insulation and ballast are placed on top of the membrane, the membrane remains at a relatively constant temperature year-round and remains protected from the harsh exposure of the weather, the sun’s rays, and mechanical damage.
As previously described, the roofing membrane is installed as in a conventional system. Once the membrane has been applied, the rest of the components, including topcoat, separation sheet, insulation, fabric and ballast must be installed. This normally consists of the following separate steps:
- Applying two floodcoats.
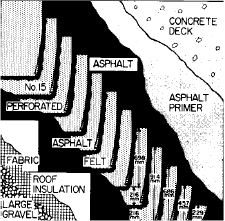
 The first step in the procedure for applying ballast to a protected membrane roof is to apply two flood coats. The membrane to receive a PMR covering must be coated with two applications of asphalt (floodcoats). The asphalt is applied with a dipper, mini-mopper, or hand mop.
- First apply the first coat at a rate of 2 kg/m2(45 lb/square) and allow it to cool.
- Apply the second coat of asphalt at a rate of 2 kg/m2(25 lb/ square) for a combined total of 3.4 kg/m² (70 lb/square). Ensure the floodcoat extends up all curbs and parapets to provide continuous protection.
- Allow the flood coats to completely cool before applying the separation In some cases (such as hot days) it may be necessary to let the flood coats cool overnight.
- Applying the separation sheet, if specified.
The second step in the procedure for applying ballast to an inverted built-up roof design is to apply the separation sheet, if specified.The PMR system is designed to allow the insulation to actually float on top of the membrane. In most cases, a separation sheet will be specified as necessary in order to prevent the insulation from bonding to the floodcoat. The separation sheet usually consists of a single layer of 6 mil polyethylene film. To apply the separation sheet:- Start at the low point of the slope and unroll the rolls of polyethylene perpendicular to the slope across the roof.
- Extend the polyethylene to the top of the cant strips.
- Lay succeeding rolls of polyethylene by overlapping the previous layer by at least 25 mm (1 in), on both side and end laps. Ensure that the polyethylene is laid loose, free of all wrinkles, and pulled tight. Ensure a single ply coverage over the entire roof surface.
- Applying the insulation.
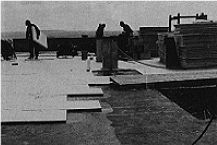 The third step in the procedure for applying ballast to a protected membrane built-up roof is to apply the insulation. The insulation is laid loose over the separation sheet or membrane. The insulation adjacent to the roof perimeter parapets, curbs, and penetrations must be cut at a bevel to fit the cant strip. The insulation must be cut to fit within 6 mm (1/4 in) of the cant strips, curbs and all other roof penetrations.
 - Applying the fabric.
In lightweight systems where a geotextile fabric is required, ensure that all the insulation is covered with the fabric, and that it is pulled tight and is free of wrinkles. The geotextile fabric should be over lapped at all sides a minimum of 300 mm (12 in) and at ends a minimum of 600 mm (24 in). Carry the fabric up the cants and all curbs at least 100 mm (4 in). - Applying the ballast.
 The fifth and final step in the procedure for applying ballast to a PMR roof is to apply the ballast. The ballast covering of gravel is applied to weigh down the insulation and fabric to prevent wind uplift and water flotation.The gravel must be washed, dry, free of fines and splinters. Ballast stone should meet the membrane manufacturers requirements for the desired wind uplift resistance with regard to size and coverage rates. It is typically required that stone ballast meet the requirements of ASTM D448 size 4, 357 or 3, with larger stone size required for heavier coverage rates. It is important to use only hard stone. Soft minerals, like some limestones, sandstones, or shales will break down over time from freeze/thaw action and lower the wind resistance of the roof and may clog the drains.
When a filter fabric is not used in a PMR system, the amount of gravel used per square feet will depend upon the thickness of the insulation being covered. The quantity and coverage of ballast must be enough to prevent the flotation of the foam in water.
The formula for determining the amount of gravel required to prevent flotation is:
- 60 kg/m² (12 lb/ft²) for up to 50 mm (2 in) thick insulation plus an additional 25 kg/ m² (5 lb/ft²) for each additional 25 mm (1 in) of insulation thickness.
For example, 150 mm (6 in) thick insulation will require 156 kg/m² [60 + (4 x 24)] (32 lb/ ft²) of ballast.
Applying the Ballast
- Apply the gravel to a uniform thickness over the entire roof Additional and/ or larger sized gravel may be required at roof perimeters and/or corners to meet wind uplift resistance requirements.
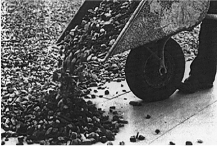
- The gravel is typically delivered to the roof elevation by mechanized equipment and placed using a combination of mechanized equipment (cranes with sufficient reach, powered or unpowered gravel transporters, or spreaders) and spread uniformly with pushers or rakes.
Always spread the gravel as it is loaded on the roof to avoid piling (overloading the deck).