Hand tools are perhaps the most important pieces of equipment for a roofer. Without the proper tools, the roofer cannot perform or work safely. Tools must be respected and cared for by the people who use them.
 A list of standard tools that a roofer may require includes:
- Tool box or bag to carry the hand tools.
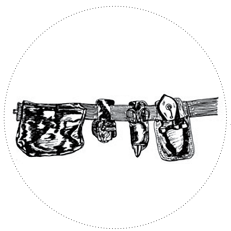
- Nail bag with proper belt and hatchet holder.
- Tape measure.
- Hammer -0.45 kg (16 oz) with a straight claw and steel shaft.
- Insulation (double edged) knife with sheath attached to belt.
- Utility knife with replaceable blades.
- Roofer’s hatchet with gauges.
- Roofer’s all-purpose utility bar.
- Small 200 mm (8 in) crescent wrench.
- Chalk line and chalk to snap straight lines on decks or felts etc.
- Screwdriver.
- Tin snips (combination snips) to cut metal.
- Pointing trowel to apply mastic cements around vents and flashings.
Other tools also used by roofers include:
- Measuring tools, either cloth, metal or digital. Cloth tapes are sometimes preferred over metal tapes because they do not kink and will follow the contours of the roof.
- Handsaws to cut wood, insulation or metal.
- Cold chisels to chip concrete or cut metal.
- Pliers/side-cutters.
- Levels to determine slopes (i.e. for drainage).
- Framing squares to lay out dimensions.
- Hand drills to drill holes.
Safe Practices When Using Hand Tools
A responsible roofer always maintains their tools in good working order, free from rust, dirt or asphalt. Do not use any damaged tools as they may be inadequate for the job and could cause an accident and personal injury. Some general safety rules for the use of common hand tools include:
- Use tools only for the purpose for which they are designed. For example, use a screwdriver to remove or install screws and not for prying.
- Always inspect tools for possible defects before use.
- Do not use defective tools.
- Lightly oil tools to prevent corrosion and rust. Remember do not oil the handles or gripping surfaces.
- Always clean tools after use and return them to the proper storage place.
- Always inspect your tools, make sure they are sharp, clean and in proper working order.
- When using knives with disposable blades, use the proper type of blade for the particular job.
- Never use a hatchet with a split handle, replace it with a new handle.
- Always follow manufacturers’ instructions for proper use of any tool.
2.1.1.1 Measuring Tools
Part of a roofer’s job is fitting and cutting various materials. In order to do this accurately, you will have to understand the proper procedures for measuring. Remember, you will avoid a lot of mistakes and wasted material if you follow the old rule: “Measure twice, cut once”.
There are a number of tools that can be used for measuring including steel or cloth tape measures, laser tape measures, combination squares, steel squares etc. The following describes some of the commonly used measuring tools and their proper use.
Every roofer should always carry a properly working measuring tape.
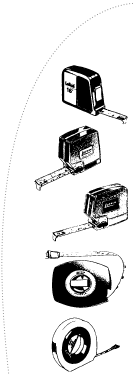
Pocket tapes
“Pocket” tapes are typically made from 12.7 mm to 25 mm (1/2 in to 1 in) wide strips of spring steel that has been formed into a trough shape to provide rigidity when extended. These tapes are typically self-retracting and have a locking mechanism to prevent retraction while being used to take measurements. “Pocket” tapes come in varying lengths and usually measure with a length between 3 and 7.6 m (10 and 25 ft).
Tapes 15 m (50 ft) or Longer
Longer length tapes are typically fabricated from narrow, flat lengths of steel, cloth, or fibreglass reinforced fabric in lengths of 15 m to 30 m (50 ft to 100 ft) although longer lengths are available. Long tapes typically have winder type retractors although the shorter lengths may be available in a self-retracting format.
- Reading Measuring Tapes
Most long metric tapes are graduated in millimetres with each 10 mm increment marked on the tape. For easy reading, some metric steel tapes show every 100 mm increment in large numbers. Every metre is also marked on the tape.Most Imperial tapes are graduated in fractions of an inch with each inch (or 1/10ths of a foot for some longer tapes) and feet increment marked on the tape. Many Imperial “Pocket” tapes will also have every 16 inches identified for ease of use in laying out conventional wood framing. 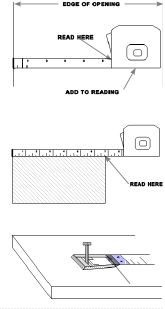 Taking an Inside Measurement at an Opening To take an inside measurement, first place the hooked end of the tape against one side of the opening. Uncoil tape across opening butting the tape case against opposite side of opening. Take measurement reading at edge of tape case, adding the width of tape case to obtain correct measurement. The width of the tape case is indicated on the side of the tape.
- Taking an Outside Measurement
Pull tape out from case and hook end of tape over end of object to be measured and read dimension on tape. Observe which dimension lines up with point to be measured. - The Loop (Long Tapes)
Measurements start from the outside face of the end loop on a steel tape. If a nail is used, an allowance of about 3 mm (1/8 in) should be made. Since hook devices on tapes vary, check the tape you are using.
Laser Tape Measures
Laser tape measures are alternatives to a conventional tape measure. They can be used to calculate measurements of up to 198 m (650 ft) and are accurate to within 3 mm (1/8 in) when measuring a distance of up to 91.5 m (300 ft).
The process of using a laser tape measure is similar to using a conventional tape measure, except you use a laser beam instead of meta or cloth tape measure.
- Place the laser tape measure on one end of what you want to measure
- Aim laser beam so that it hits a solid target at the spot you want to measure up
to. On a roof, the target could be a wall or parapet.
Once you have the laser at the right spot, press the button, and the tape measure
will calculate the distance and will display the digital measurement on the screen.
- Some types of laser tape measures will allow you to measure multiple distances and adds them together automatically.
2.1.1.2 Squares
Squares are primarily used for measuring angles.
Steel Square
Layout at 90° angle and several 45° angles. If the points are equal distances, the angle will be 45°.
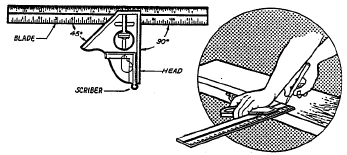
Combination Square
A combination square is a multi-use measuring instrument which is primarily used for ensuring the integrity of a 90° angle, measuring a 45° angle, measuring the center of a circular object and simple distance measurements. It can also be used to determine level and plumb using its spirit level vial.
2.1.1.3 Knives and Axes
Utility or Safety Knife
This common knife has many configurations, some with a retractable blade and others with extendable snap-off blades. The main distinguishing feature is that the blade is much like a replaceable razor blade set in a plastic or metal handle.
The knife is used to cut roofing felts and for other general purposes such as marking cut lines. It can also be used to trim wood or cut asphalt shingles. It is an accurate marking and layout tool, but must be handled very carefully. No sharpening is required, since the blade is disposable.
Blades
Utility blades can be used to cut most roofing felt insulation, and keg wrappers. Hook blades can be used to cut shingles, mineral surface felt, and reinforced felts.
When using a knife, always carry the knife sheathed or closed; keep the blade sharp; and cut away from yourself.
Roofing Knife
The roofing knife has a cutting edge all around the blade. It is commonly used for cutting insulation. The blade needs to be sharpened regularly.
Axes
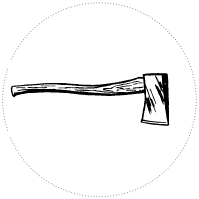 The heavy axe is used by roofers for cutting roof membranes when repairing or re-roofing a roof. It is also used by the kettle operator to skin and quarter kegs of asphalt to place in the kettle. The kettle operator should keep a spare axe on site as well as wedges to tighten loose axe heads. The axe should be kept clean and sharp. Cracked or broken handles must be replaced.
When using an axe, be aware of the follow-through path that the blade will take if you miss, or if the blade is deflected. Never swing an axe or hatchet so hard that if you miss your mark you are unable to stop the blade from harming you or others.
Shingler’s Hatchet
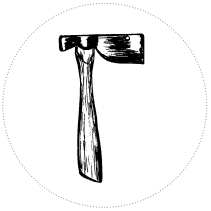 Another form of axe used by the roofer is the shingler’s hatchet. This hatchet is used to cut or trim and nail shingles. The blade has a double bevel edge. The hatchet has a nailing head and a slot to pull nails. Roof gauges are a unique feature of this hatchet. The gauges fit through holes drilled in the head of the hatchet. The placement of the gauges sets the exposure of the shingles. This can be used with asphalt or cedar shingles.
2.1.1.4 Saws
The tools used to cut and shape wood, metals, and some insulations take many forms, but you can do most jobs with just a few of them. Remember to always keep cutting tools sharp. Not only does a dull tool make your job harder, but it can slip and injure you as well.
Although much of the work once done with hand-saws is now done with power tools, the handsaw still has a place in a roofer’s tool bag. It can reach into corners, cut flush with an adjoining surface and get into places a power saw can’t.
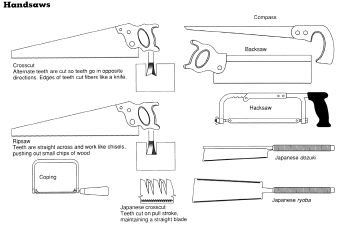
There are many types of handsaws and each is designed for a specific use.
- Crosscut saws are designed to cut across the grain of wood. They have between 8 and 12 teeth per 25 mm (1 in). The teeth are bevelled to score the wood on both sides of the cut.
- Ripsaws have sharpened teeth, straight across (5 to 6 per 25 mm (1 in)), designed to cut with the grain.
- Compass saws are used for hand cutting a radius after a hole has been drilled.
- Hacksaws are used primarily for cutting metals and plastic.
Hacksaws
The hacksaw is a metal cutting tool which, if improperly used, can be dangerous to the operator.
Never guide the blade at the beginning of the stroke with your thumb or fore-finger. Should the blade stick, or the stroke pressure become too great, the fingers may be cut.
Always keep one hand on the handle, and the other on the frame.
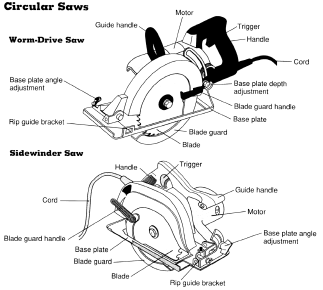
Circular Saws
Circular saws can be used for a variety of purposes: cutting, ripping and mitering. With the right blade, it can cut almost any material, including wood, plastic, concrete and steel. They are designated by the size of the largest blade they will accept.
Circular Saw Safety
Accidents with circular saws are responsible for many work-site injuries. Always follow these safety precautions when operating a circular saw.
- Never remove the blade guard.
- Always support the work securely and in a way that won’t pinch the blade.
- Always unplug the saw, or turn off the motor when changing blades or making adjustments.
- Always wear safety goggles or glasses when operating the saw.
Reciprocating Saws
Reciprocating saws are used to cut material when access is limited. Blades are available for cutting wood, plastic, and metal, and come in varied lengths. In general, use the shortest blade that will do the job.
- Always hold the saw so that you are cutting away from you.
- Never change or adjust blades until the saw is unplugged.
- Always wear safety glasses or goggles while operating a reciprocating saw.

2.1.1.5 Hammers
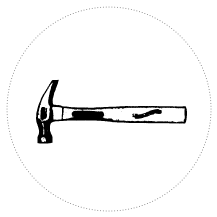 The hammer is probably the most often used of all the hand tools. It is made in a variety of styles and sizes. Hammers are sized by the weight of the head. They range in size from 55 grams to 1.4 kg (2 oz to 3 lb).
Hammers are generally classed as hard and soft head. Hard headed hammers fall into these categories: carpenters hammer, ball peen, and heavy malls or sledge hammers. Soft headed hammers are made with heads of plastic, brass, copper or rawhide and are used to provide a blow and not damage a hard or finished surface.
Hammer handles are made from a variety of materials, including hardwood, fibreglass, and metals.
Safety Rules for Hammers
- Always use eye protection when using hammers.
- Hammers should always be used for their intended purposes, e.g. a nail hammer should be used to drive or pull nails.
- Always make sure that the hammer head is tight.
- Always strike an object squarely with the hammer. Make sure the hammer is parallel to the surface being struck.
- Always choose the correct size hammer for the job.
- Always grasp the hammer near the end of the handle. This gives full striking power to the head of the hammer.
- Never strike one hammer against another. Since hammers are case hardened, they may send steel splinters flying into your face and arms.
- Always replace loose or cracked handles immediately.
- Always use only enough force to drive the nail heads flush with the felt or shingles. Excessive force will cut through the material, eliminating the holding power of the nail.
2.1.1.6 Screwdrivers
Screwdrivers are made in various sizes, shapes and lengths for very small precision work or large heavy work.
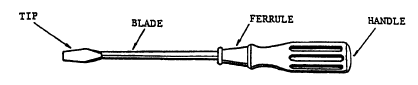
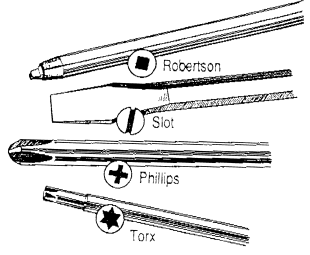
Standard Screwdriver
The most common screwdrivers are the standard (slot or “flat-blade)), Phillips and Robertson styles. Screwdrivers consist of a handle, usually made of plastic or wood, and a blade with tips to fit various types of slots.
Safety Rules for Screwdrivers
- Always use the right screwdrivers for its intended purpose (i.e. to tighten or remove screws) and select the one with the proper type and size tip.
Never use a screwdriver for prying or as a chisel.- Never strike the end of a screwdriver with a hammer.
- Never use a screwdriver for electrical testing.
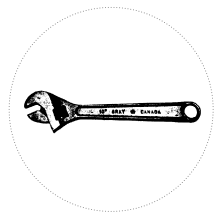
2.1.1.7 Wrenches
Wrenches are made of heat-treated steel and come in a wide variety of shapes and styles. They are available in both imperial and metric sizes. Their main purpose is to hold and turn nuts, bolts, cap screws, plugs, pipes and a number of threaded parts. There are many varieties of wrenches made such as; adjustable (crescent), open end, combination and various types of socket wrenches.